This is a guide with tutorials on how to get started with Fudge.
If you purchased a support license you can log into our support portal to clear any doubt about the theme.
We do not offer general WordPress Support, please do read our support terms before raising a support ticket.
If you have any question about your purchase you can write a message to the email address on your purchase receipt.
1. Getting Started with WordPress
3. Activating Fudge
3.1 Fudge Customize Options
3.2 Fudge Dashboard Sections
3.3 Fudge Widgets
4. Customizing Fudge
4.1 Set Title and Tagline
4.2 Static Front Page
4.3 General Site Options
4.4 Homepage Options
4.5 Event Over Settings
4.6 Social Media & Connecting
4.7 Dummy Content
5. Defining the Data
5.1 Speakers
5.2 Sponsors
5.3 Sessions
5.4 Points of Interest
5.5 Event Media
5.6 Posts
6. Editing the Homepage
6.1 Fudge Event Info
6.2 Fudge Event Description
6.3 Fudge Speaker List
6.4 Fudge Event Schedule
6.5 Fudge Registration
6.6 Fudge Sponsor List
6.7 Fudge Latest News
6.8 Fudge Latest Tweets
6.8.1 Twitter Wall Page
6.9 Fudge Points of Interest
6.10 Fudge Contact Form
6.11 Fudge Social Media Links
6.12 Fudge Event Timer
6.13 Fudge Media Grid
6.14 Fudge Facebook RSVP Stats
7. Editing Blog Sidebar
7.1 Fudge Sidebar Quotes
7.2 Other Sidebar Widgets
9. Registration Services
9.1 Eventbrite
9.2 Xing Events
9.3 EventEspresso
9.4 Woocommerce
9.5 Tickera
1. Getting Started with WordPress
Fudge is a WordPress Theme (Tip: What is WordPress?) designed to enhance your conference, meeting or event.
If you are planning a conference, meeting, seminar, workshop or similar event, congratulations “ you made the right choice.
Using Fudge requires an intermediate knowledge of WordPress. Meaning that you should be confident with the basics of WordPress.
Our theme is made for WordPress.org (as opposed to WordPress.com) this means you need a hosting provider where to activate the theme. If you don’t have a hosting provider, we suggest WPEngine.
If you are not confident with WordPress, we suggest 3 actions:
1. Watch the following Videos: What is WordPress? “ How to Install WordPress “ The Dashboard & Read the handy guides at WPBeginner. Everything you need to know about running a WordPress site is in the web.
As WordPress is a community effort, there is an answer for most of the doubts you may have.
2. Run a test installation with the default theme and give it a whirl. Play with it and get confident with different sections of the Dashboard.
3. Use the WordPress Forums and Docs. Search the Forums for your question, there will probably be an answer.
2. Getting Started with Fudge
We built Fudge using the best that WordPress has to offer to showcase your event. Fudge provides great functionality in a beautiful design.
You will be able to:
“Provide your event information and description.
“Define and display all the data necessary for your event: sessions, speakers, sponsors, points of interest and media.
“Show and filter your event schedule by location or track.
“Let your attendees buy their tickets using EventBrite or amiando services.
“Show all your social media links: email, rss, facebook, twitter, flickr, linkedin, pinterest.
“Integrate the homepage with Facebook and Twitter.
“Include an awesome countdown timer.
“And so much more…
You are going to do all this by focusing on three different areas:
3 “ Fudge Widgets
Please note: Fudge does not support Child Themes.
But first things first. Let’s activate Fudge.
3. Installing Fudge
Download the updated version of Fudge from your account member’s area.
To activate Fudge head to Appearance->Themes -> Upload theme.

On “Choose File” use recently downloaded file (theme file) and click on Install Now.

The theme will take shortly to upload. When finished click on the link “Activate”.
If you want more information on installing and activating themes in WordPress, read this article.
How to Update Fudge
- Create a full website backup: This step is crucial; it will allow you to recover the site in case the update couldn’t be completed.
- Save any custom CSS you have stored under Appearance > Customize > Additional CSS.
Note: If your custom CSS is inside a child theme, it shouldn’t be a problem.

- Choose a different WordPress standard theme in the meantime. You can choose one of the WordPress standard themes.

- Delete your parent theme (in this particular case, Fudge).

- Download the last version of your theme from your account member area.
- Install your parent theme again; the version number should change; you are free to check our changelog.
- Install the classic editor (if you don’t have that plugin already installed).
- Change the settings of your “Classic editor” >> Default editor for all users: Classic Editor.
- Activate your parent or child theme (that will depend on your initial setup)
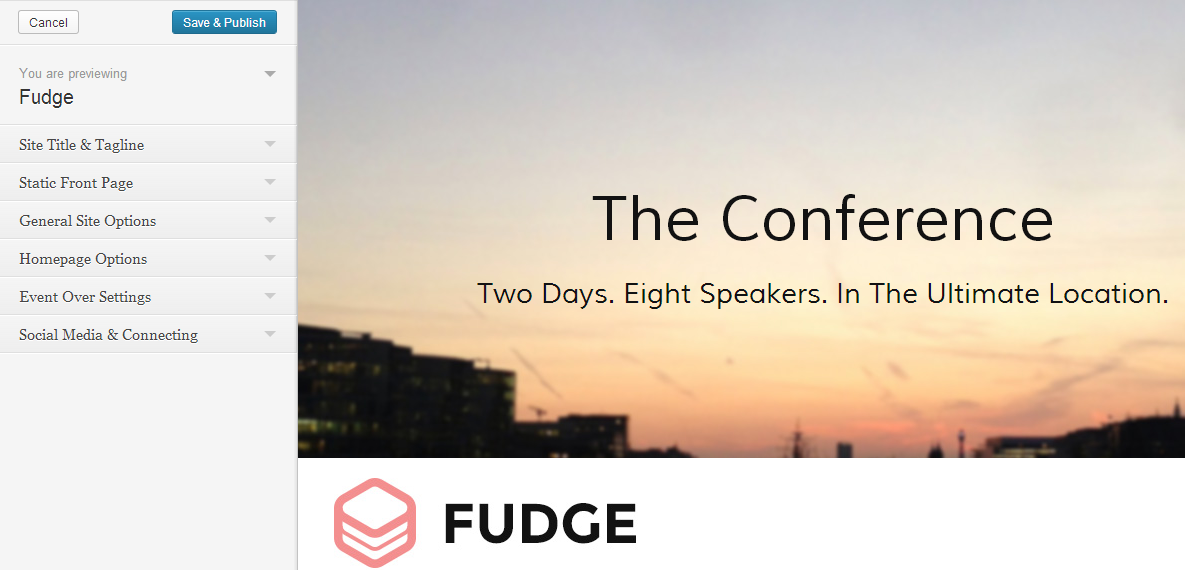
3.1 Fudge Customize Options
Under Appearance->Customize you will see different options to customize the theme.
Click on Image to enlarge
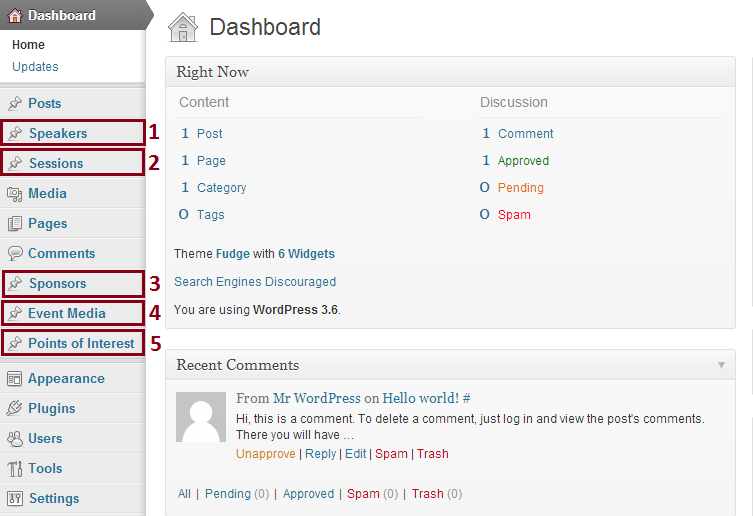
3.2 New Fudge Dashboard Sections
Five different sections have appeared. These sections take care of the relevant data of your event. We will explain you how to use them in short.
Click on Image to enlarge
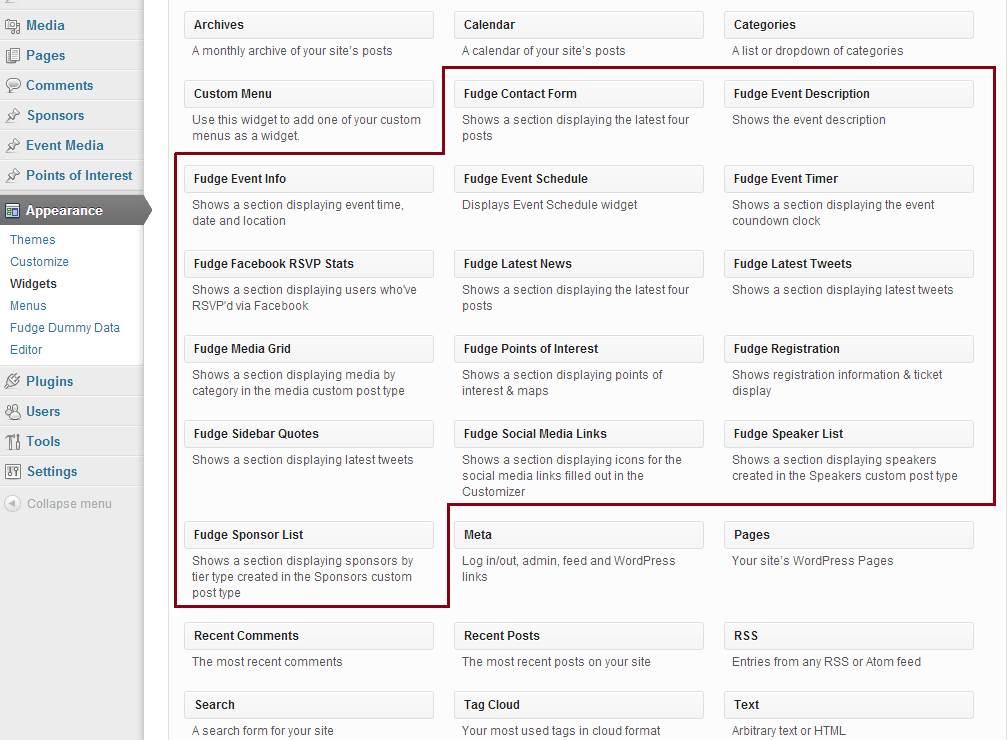
3.3 New Fudge Widgets
You can add, arrange, and remove these widgets as you like to configure your homepage and blog sidebar. You can add some or all of the widgets. We will explain every widget so you can choose the ones that work best for your event.
Click on Image to enlarge
4. Customizing Fudge
Now that you have activated Fudge, it is time to set it up according to your needs.
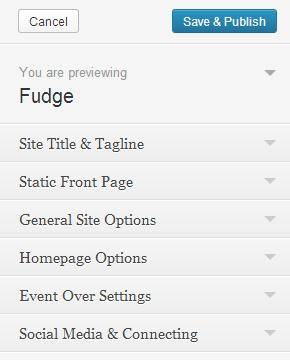
Please head to Appearance->Customize.
We always suggest to activate the theme on a fresh WordPress Installation with no plugins and no previously populated content.
Let’s have a look at the available options. Don’t forget to click on “Save and Publish” when you are done.
Click on Image to enlarge
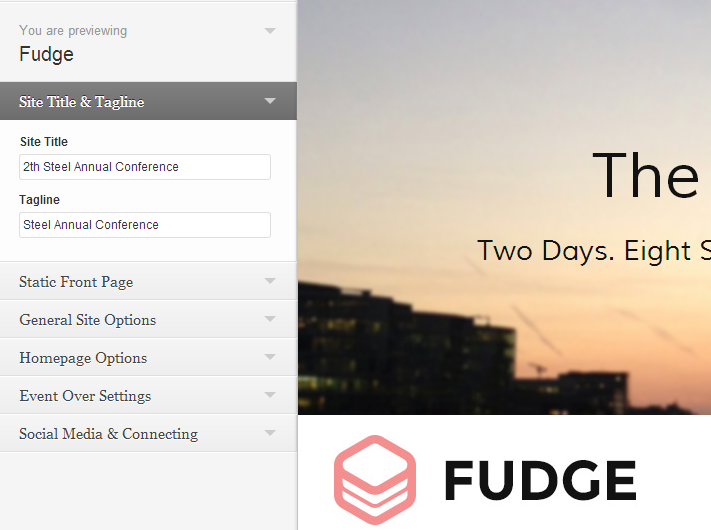
4.1 Set Title and Tagline
Here you can set your Site Title and Tagline. As you will see these are not the title and tagline that is seen in the homepage. This fields are important in SEO terms.
Click on Image to enlarge
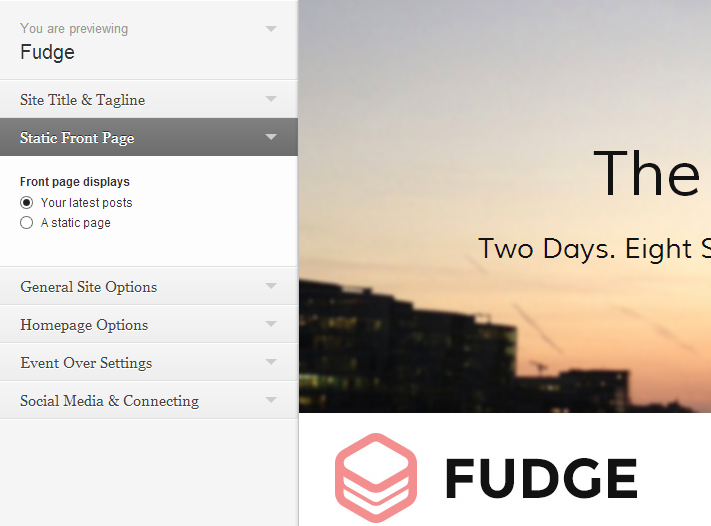
4.2 Static Front Page
Select Your latest posts, as this theme has been designed for this option. Falure to select this option will result in the Widgets not displaying.
Click on Image to enlarge
4.3 General Site Options
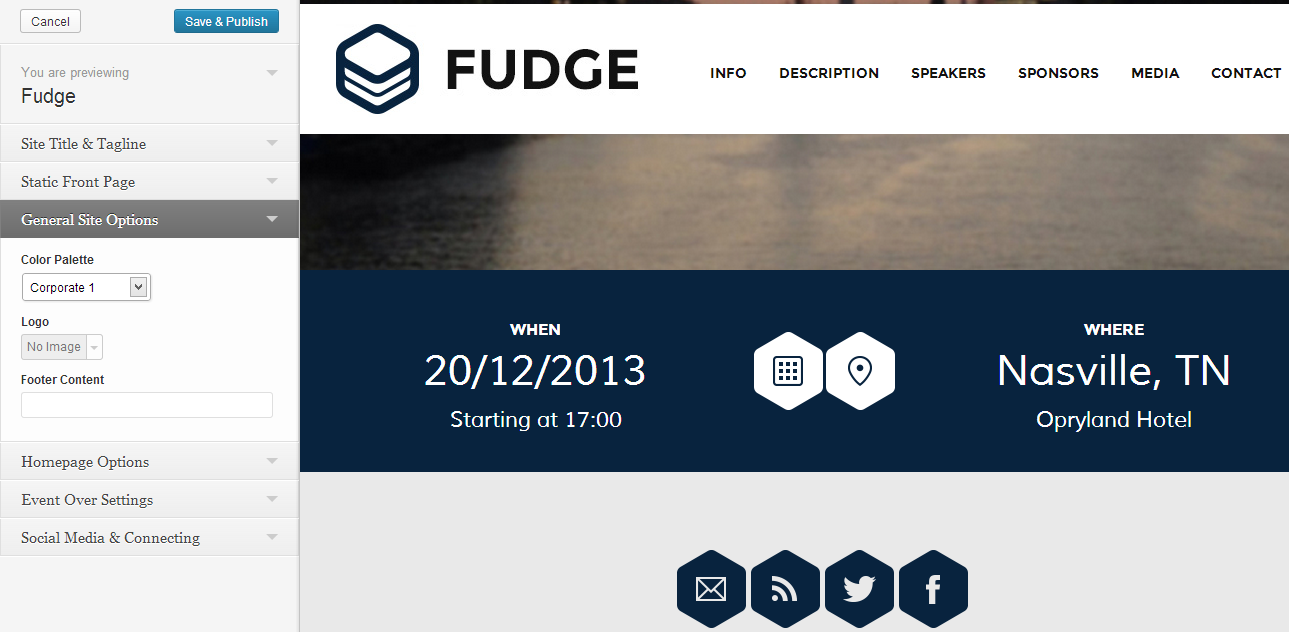
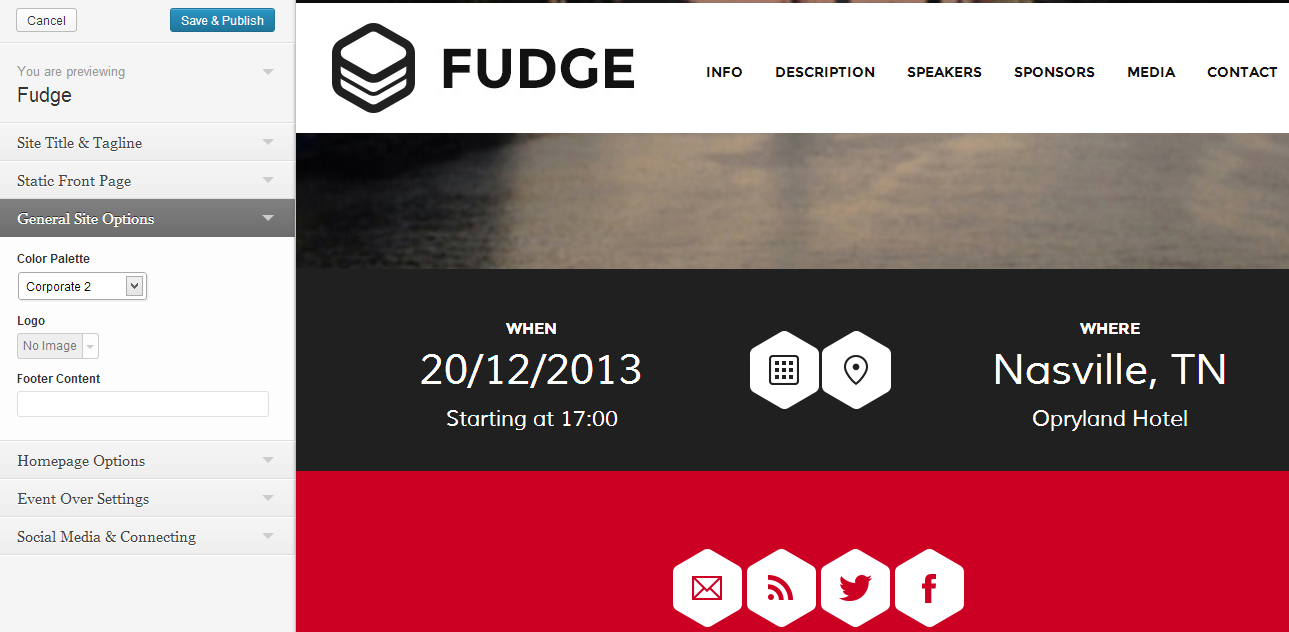
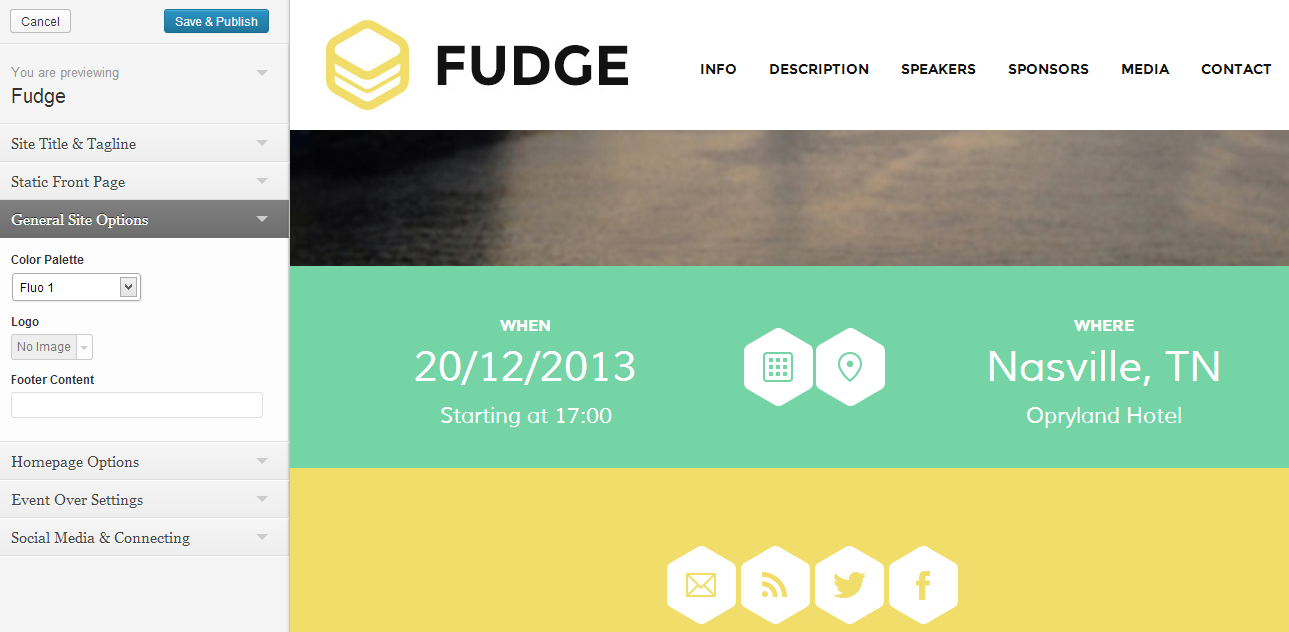
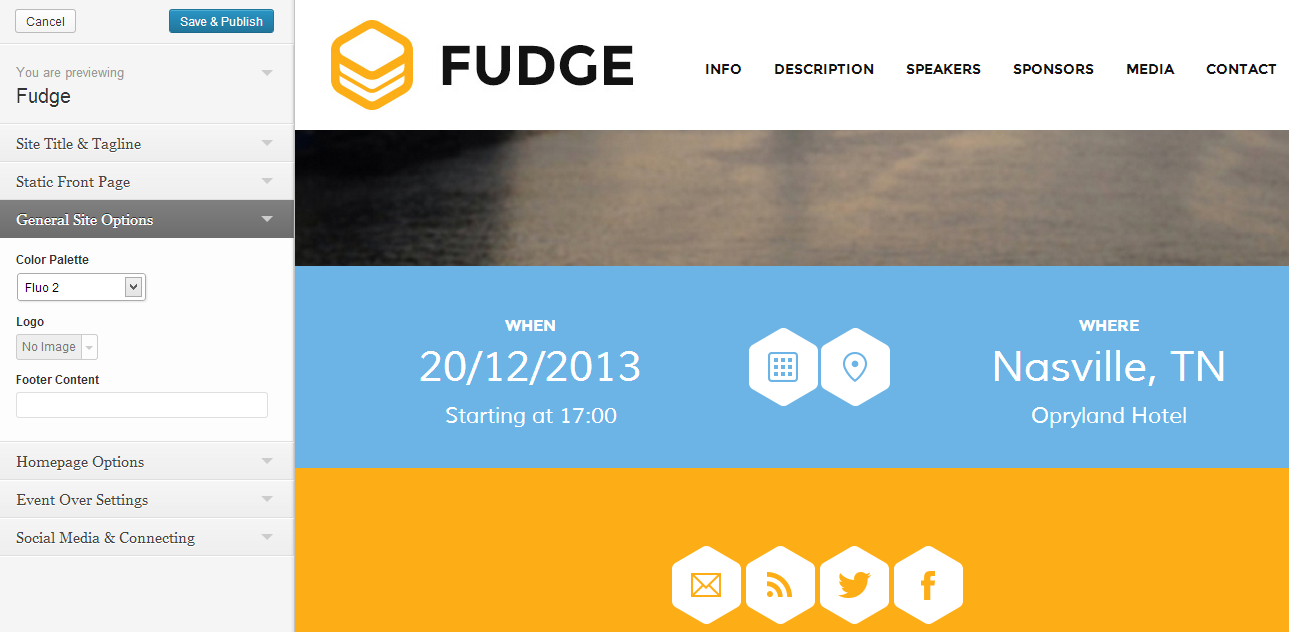
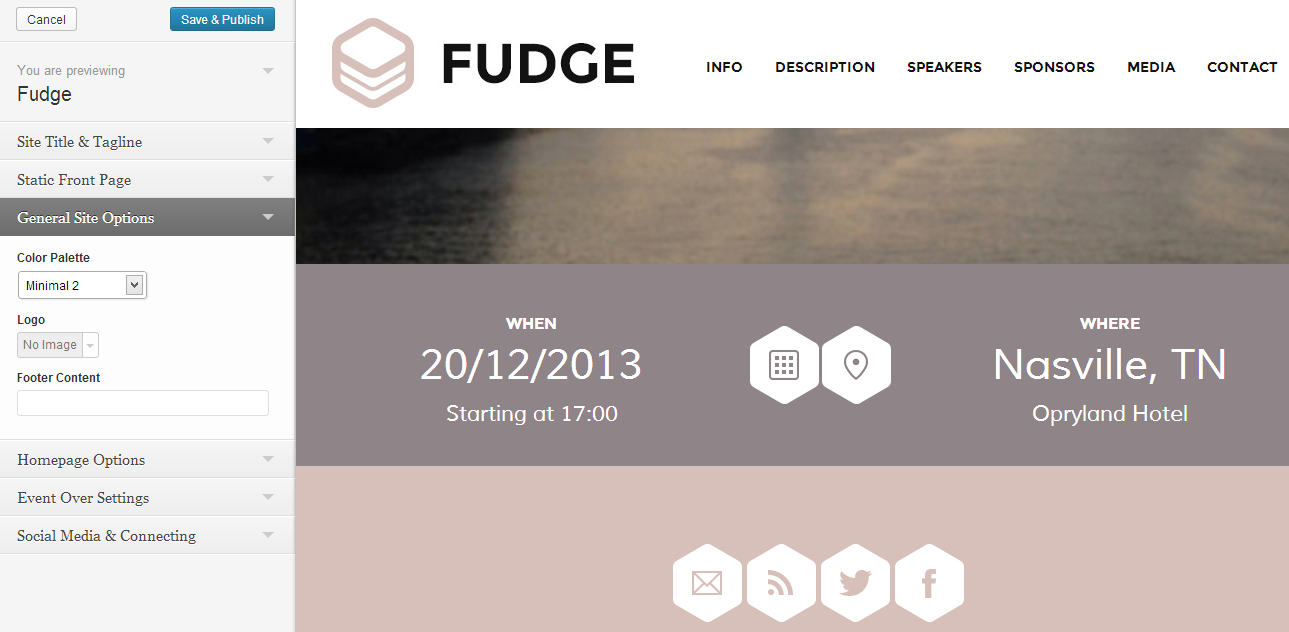
Here you can choose the color palette for your theme. Click on the dropdown list Color Palette to see how the preview changes.
To upload your logo click on the arrow. The “Upload New” tab will appear. You just have to drop a file there or browse it by clicking on “select a file”. The file should not be larger than 304 x 93 pixels to leave enough space for navigation links.
Note: The navigation links in the menu are added by providing a name in the “Add to Main Navigation?” field of some widgets. Remember not to add too many items in the navigation area as it will impact on the layout rendering. We suggest a maximum of 5 items.
You can also add a footer text in the “Footer Content” field. It will be placed under your Site Title.
Some widgets have been activated for you to better see how options affect the theme, don’ worry you will be adding widgets very soon.
See the image below:
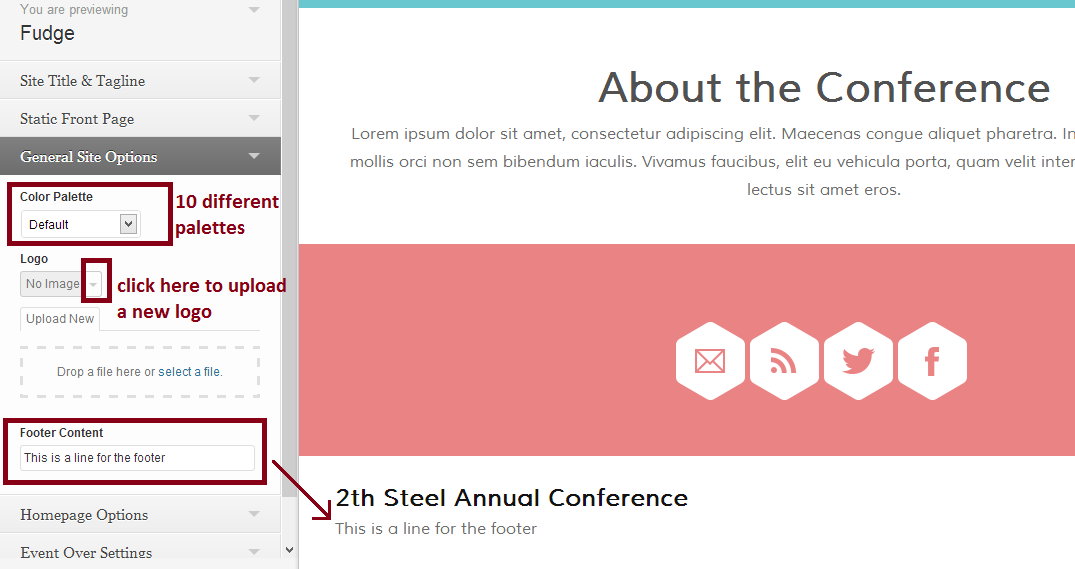
There are ten different color combinations, these are:
“Default Palette
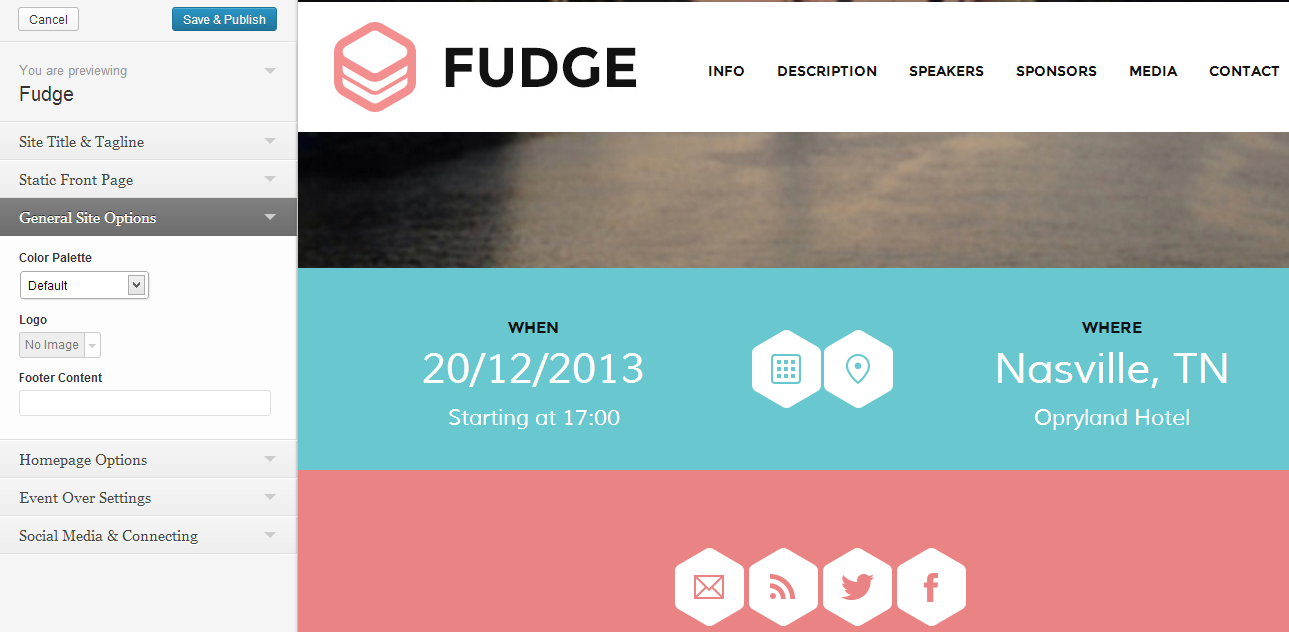
“Corporate1 Palette
“Corporate2 Palette
“Fluo1 Palette
“Fluo2 Palette
“Fluo3 Palette
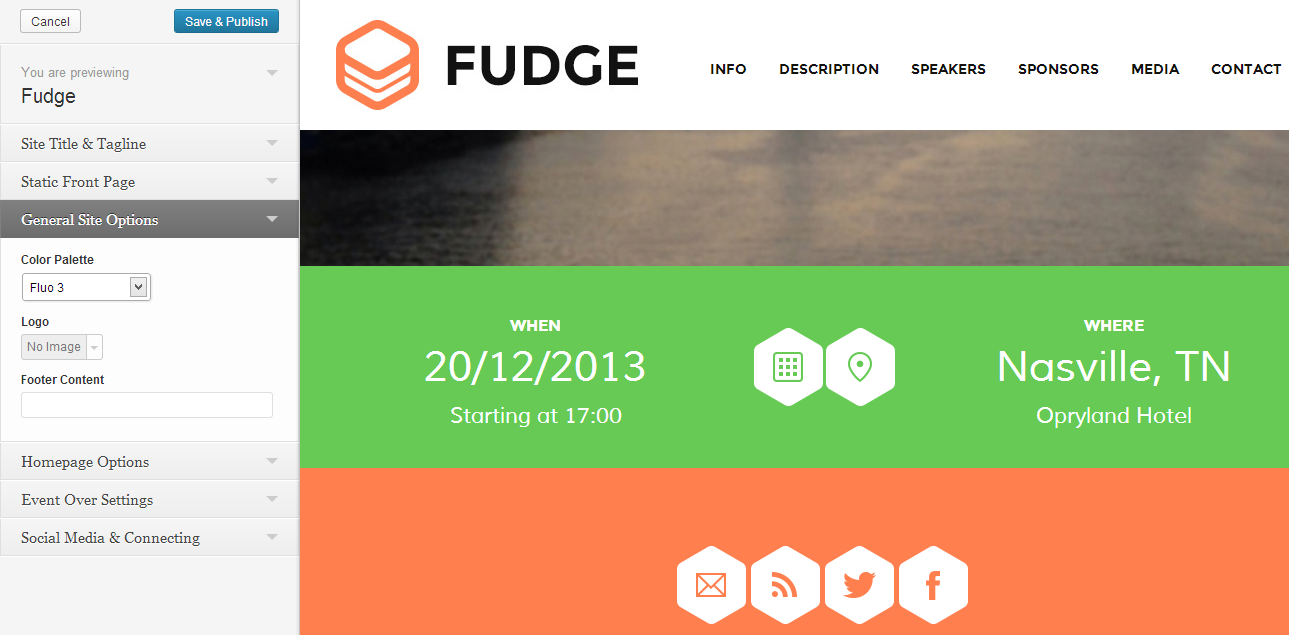
“Geek1 Palette
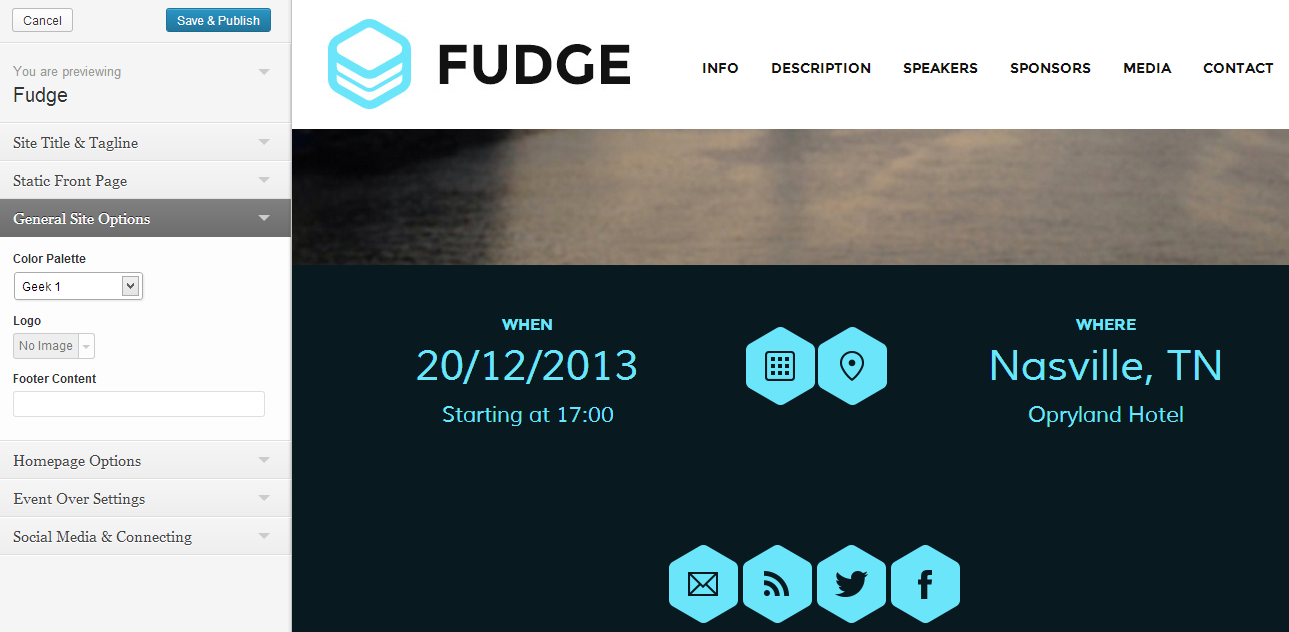
“Geek2 Palette
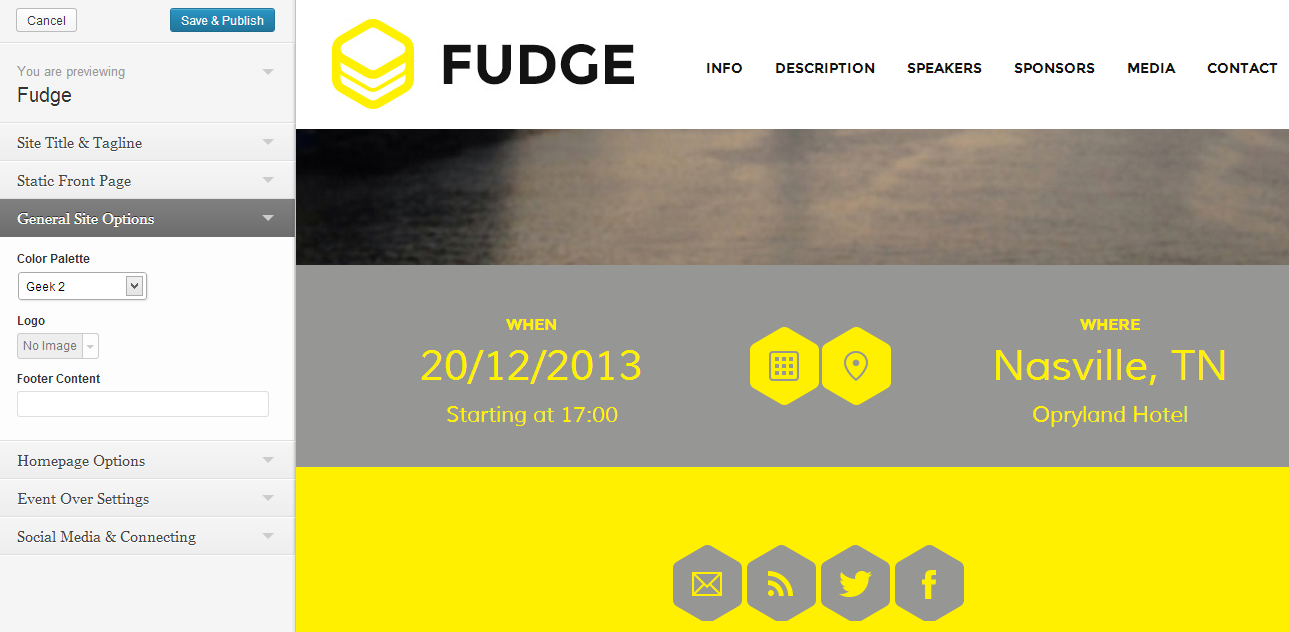
“Minimal1 Palette
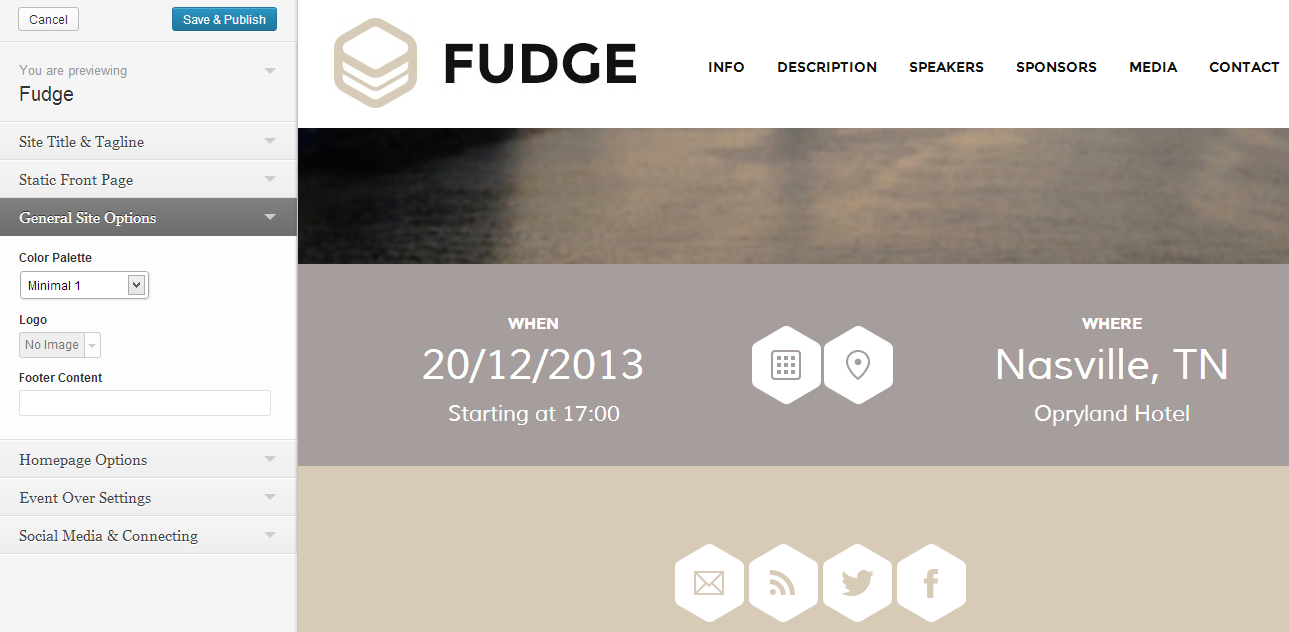
“Minimal2 Palette
Click on the Images to enlarge
4.4 Homepage Options
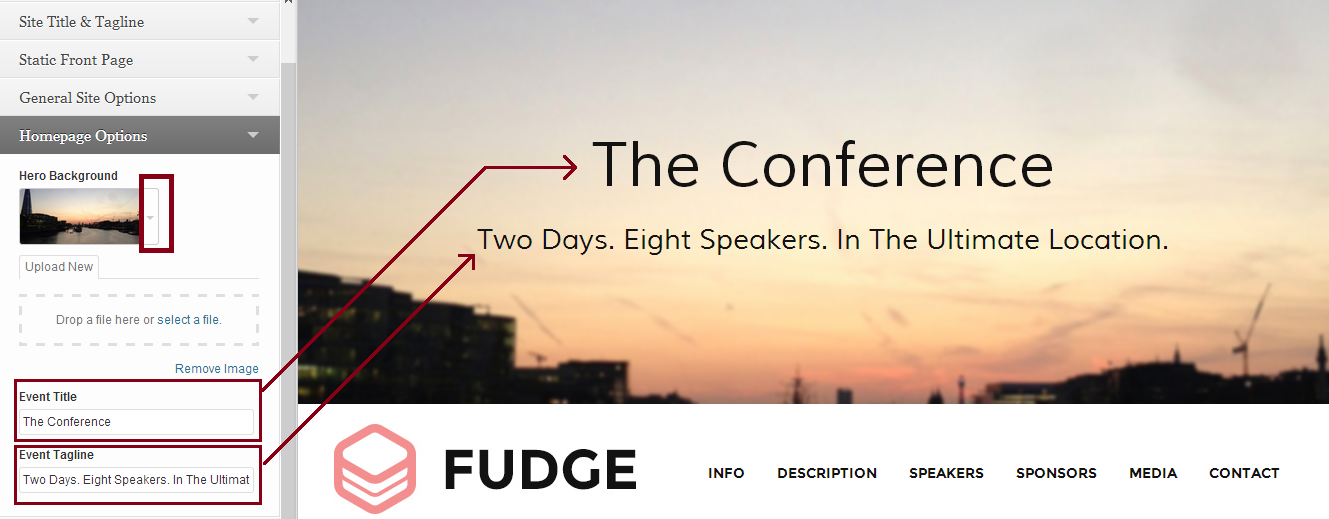
In this section you can define your background image, and set the title and tagline for the homepage.
For the background image please upload an image of exactly 1600 x 724 pixels.
Click on Image to enlarge
4.5 Event Over Settings
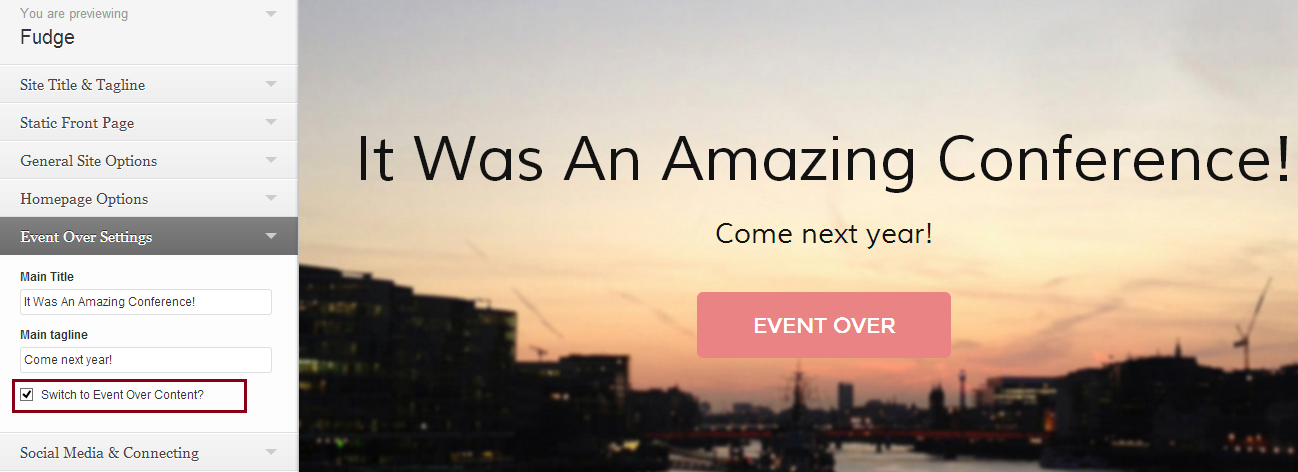
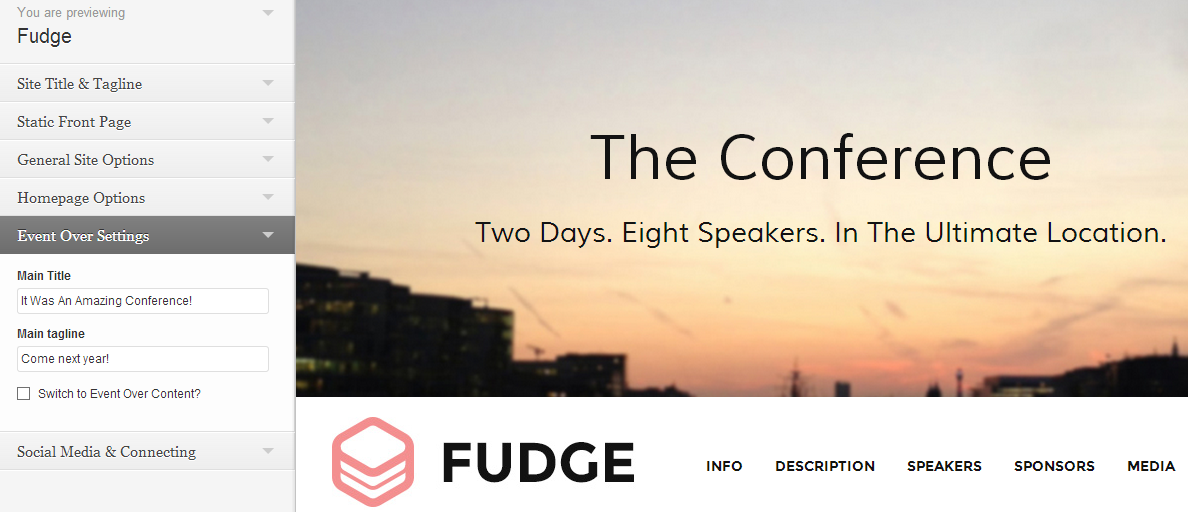
This section allows you to enter a different title and tagline for the finished event. Enter the text of your choosing and click the checkbox “Switch to Event Over Content” once the event is over.
You can preview the alternative title and tagline and come back to the original ones by checking and then unchecking the control again.
Click on the Images to enlarge
4.6 Social Media & Connecting
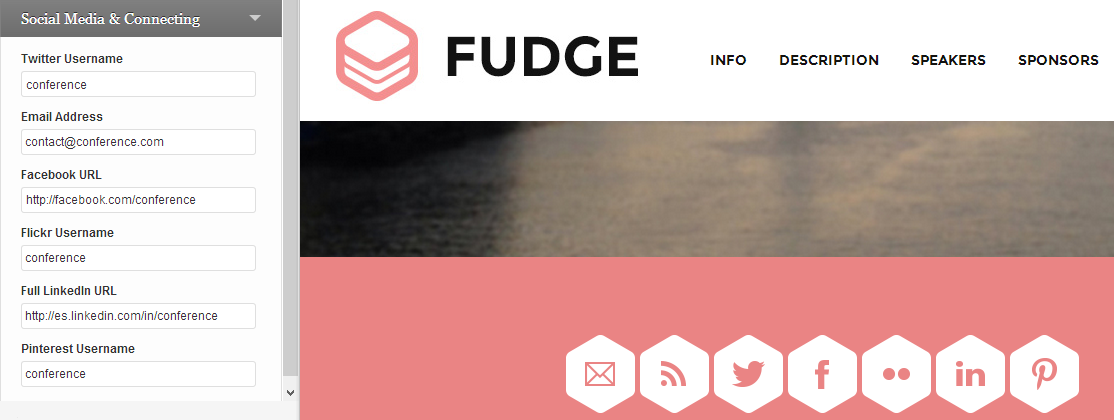
In this section you can provide as many social links as you want or have. Some may be useful for you and some not.
“ Twitter: enter the event Twitter username.
“ Email: enter a contact email address.
“ Facebook: enter the full URL of your Facebook Page.
“ Flickr: enter the event Flickr username.
“ LinkedIn: enter a full LinkedIn URL profile.
“ Pinterest: enter the event Pinterest username.
As you can see in the following image all fields have been filled with example values.
For you to better see the result, the widget that shows these links with buttons has been activated. Don’t worry we’ll show you how to do this very soon.
Click on the Images to enlarge
4.7 Dummy Content
Now that we have seen all the available options under Customize, Fudge provides a function to populate the site with dummy content.
Please read this carefully.
By clicking on Appearance>Fudge Dummy Content; you will populate the whole site with dummy content. While this is great if you don’t know where to start, it is non revertible.
Therefore you will need to delete the unnecessary content generated. This can take quite some time.
We suggest to populate with dummy content only if you are not sure about how WordPress works and want just to edit content and pictures.
Note: Populating the site with dummy content does not exclude reading this guide as you may still need to refer to it to change the populated options.
5. Setting Up The Data
Before beginning to set up our homepage with widgets, these need some data to work and display the information properly.
In this section we will show you how to add new Speakers, Sponsors, Sessions, Points of Interest, Media and Posts for your event.
5.1 Speakers
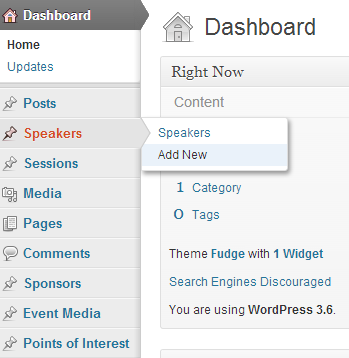
Creating Speakers is very easy. Head to Dashboard>Speakers>Add New.
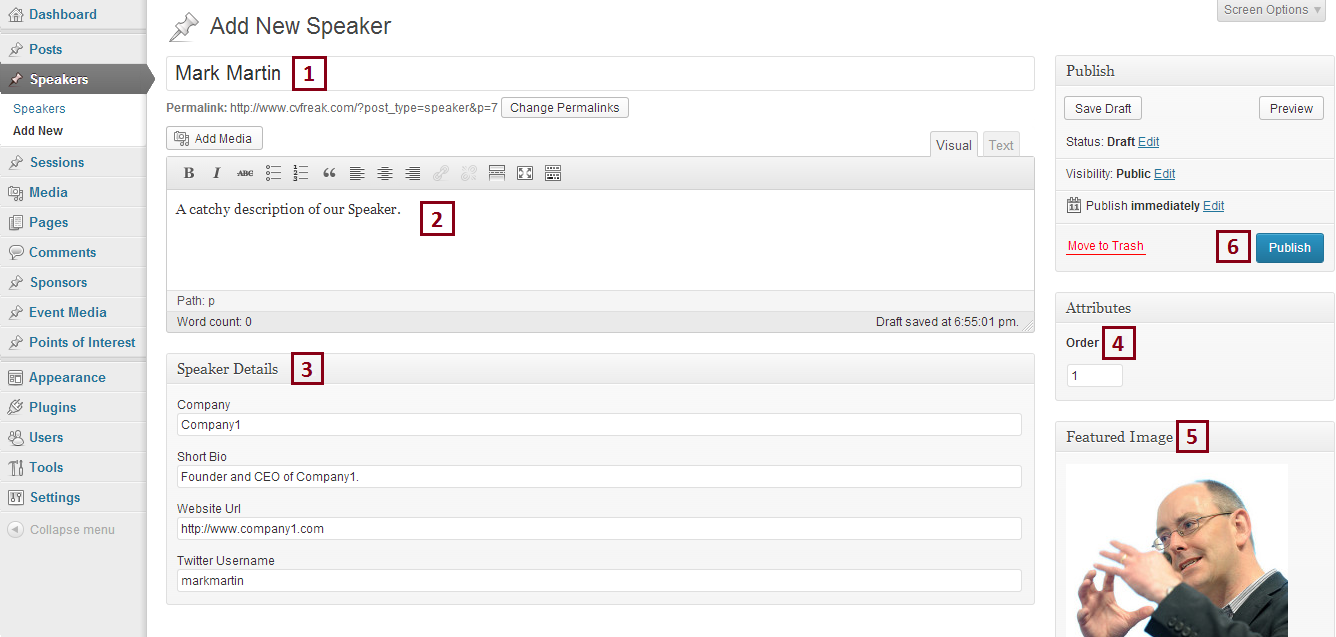
Here you will have to provide some information about the Speaker:
1 “ Title: enter the name of the Speaker.
2 “ Description: add a catchy description about the Speaker.
3 “ Speaker Details: enter some details fields for the Speaker, Company, Short Bio, Website Url and Twitter Username. Speaker bio should not be very long for optimal rendering.
4 “ Order: here you can place a number to order the Speakers.
5 “ Featured Image: This is where you set the Featured Image that will be displayed whenever a Speaker is showed on the website.
6 “ And of course, click on “Publish”.
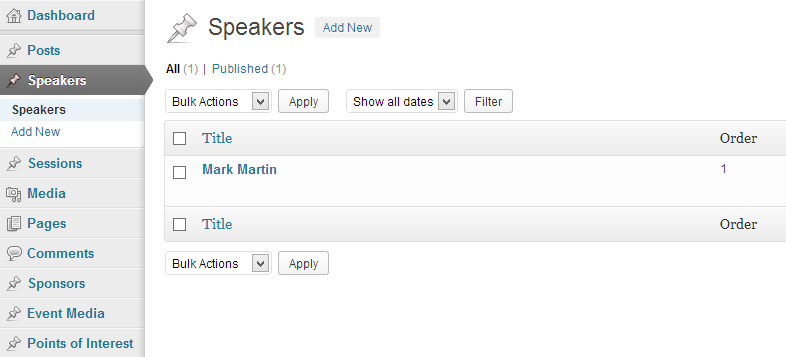
So now if you come back to Dashboard>Speakers>Speakers you will see your new Speaker in the list, as shown below:
Repeat this simple process for each of your Speakers. These speakers will be displayed in the beautiful “Fudge Speakers List” widget.
Click on the Images to enlarge
5.2 Sponsors
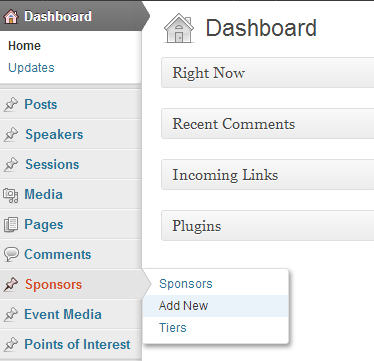
To add a new Sponsor, go to Dashboard>Sponsors>Add New.
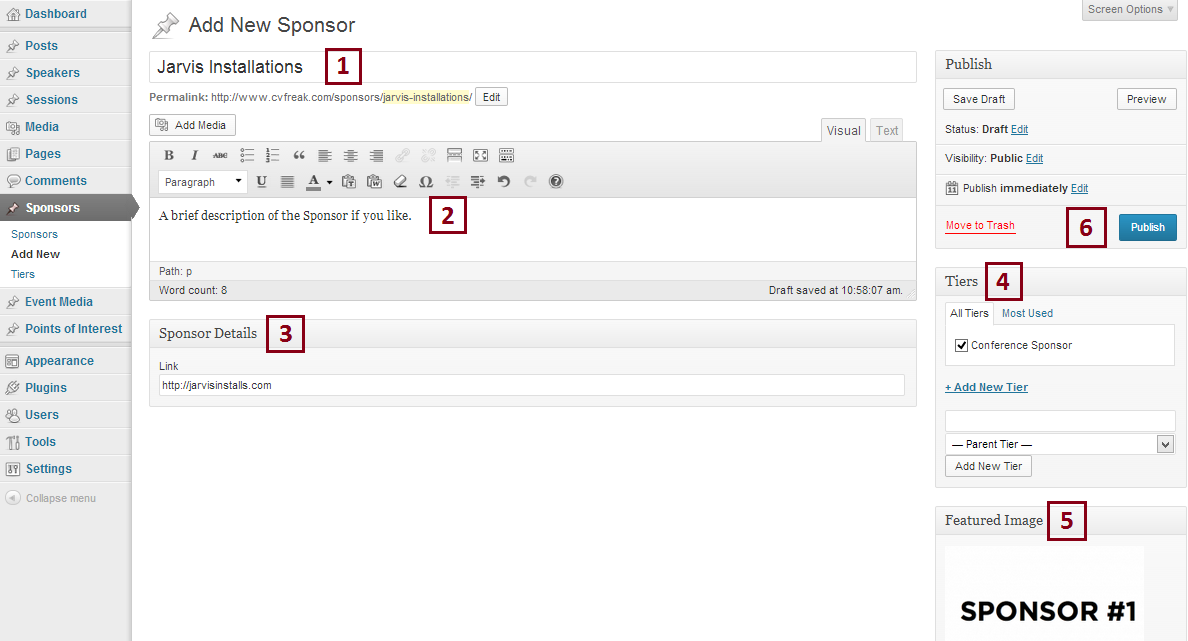
Here you will have to provide some information about the Sponsor:
1 “ Title: the name of the Sponsor.
2 “ Description: add a brief description about the Sponsor.
3 “ Sponsor Details: you can add here a link to the Sponsor.
4 “ Tier: here you can add a Tier for the Sponsor, create a new one o select a previous one.
5 “ Featured Image: this is where you set the Featured Image that will be displayed whenever a Sponsor is showed on the website. Use a 300×150 pixels image for an optimal display.
6 “ And of course, click on “Publish”.
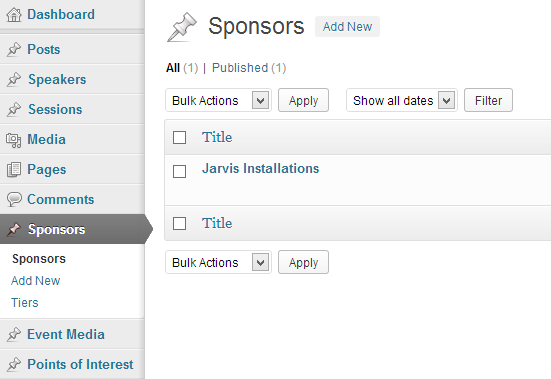
So now if you come back to Dashboard>Sponsors>Sponsors you will see your new Sponsor in the list, as shown below:
Repeat this simple process for each of your Sponsors.
Click on the Images to enlarge
5.3 Sessions
Your event is divided in a certain number of Sessions, and here is the place to define them.
Sessions can be assigned to “Tracks”, a visual way to group similar sessions according to a topic.
And also Sessions happens in certain “Locations”, the room or venue of a specific session.
So all these concepts are present in the Sessions Menu in the Dashboard.
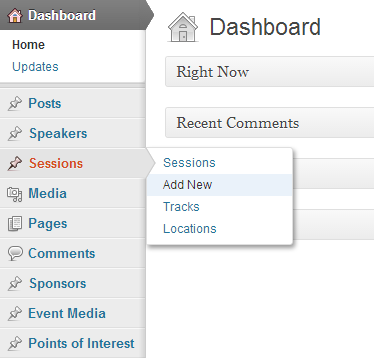
You can add all the Tracks and Locations at once, by clicking on Dashboard>Sessions>Tracks/Locations or you can create them as you need it when creating a Session.
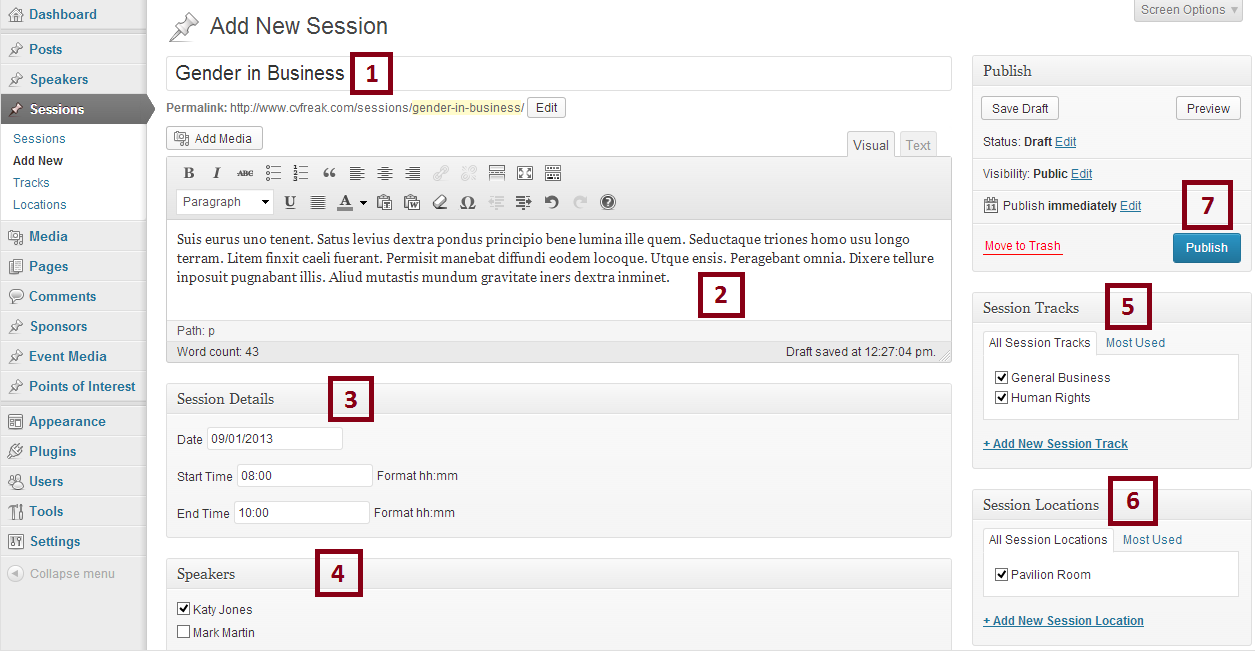
To create a Session, go to Dashboard>Sessions>Add New.
Here you will have to provide some information:
1 “ Title: add the name of the Session.
2 “ Description: add a brief description about the Session.
3 “ Session Details: Add the date of the session and the start and end time.
4 “ Speakers: select the Speaker or Speakers for this session. If you see an empty box here it means you haven’t added a Speaker yet. See how to add a Speaker in Speakers.
5 “ Session Tracks: select or create a new Track. Tracks identify a common topic area of different sessions. If you want your attendees to quickly skim through the schedule tracks are very useful.
6 “ Session Locations: select or create a new Location. Here you can specify the room or venue of a specific session, so your attendees could quickly filter Sessions by location.
7 “ And of course, once you are done click on “Publish”
So now if you come back to Dashboard>Sessions>Sessions you will see your new Session in the list, as shown below:
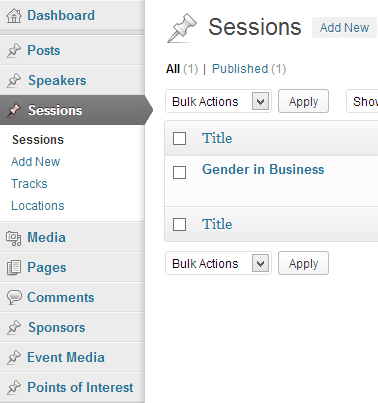
Repeat this simple process for all the Sessions of your event.
Click on the Images to enlarge
5.4 Points of Interest
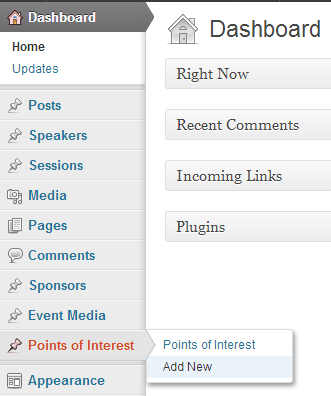
To add a Point of Interest of your event just go to Dashboard>Points of Interest>Add New.
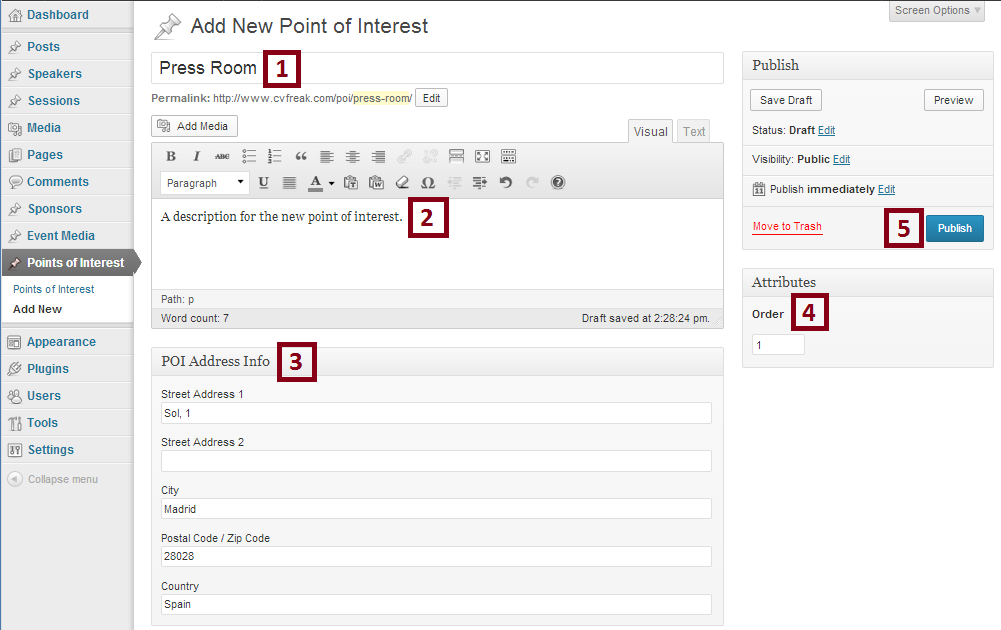
Here you will have to provide some information:
1 “ Title: the name of the new Point of Interest.
2 “ Description: add a description for the Point of Interest.
3 “ POI Address Info: provide here the street, city, zip code and country of the Point of Interest.
4 “ Order: here you can place a number to order the Point of Interest.
5 “ And of course, click on “Publish”
So now if you come back to Dashboard>Points of Interest>Points of Interest you will see your new Point of Interest in the list, as shown below:
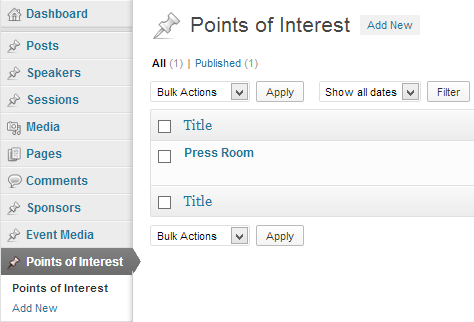
Repeat this simple process for every Point of Interest you want to appear in the Map Widget.
Click on the Images to enlarge
5.5 Event Media
To add a Media for your Event go to Dashboard>Event Media>Add New.
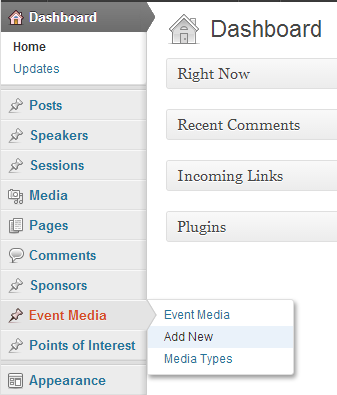
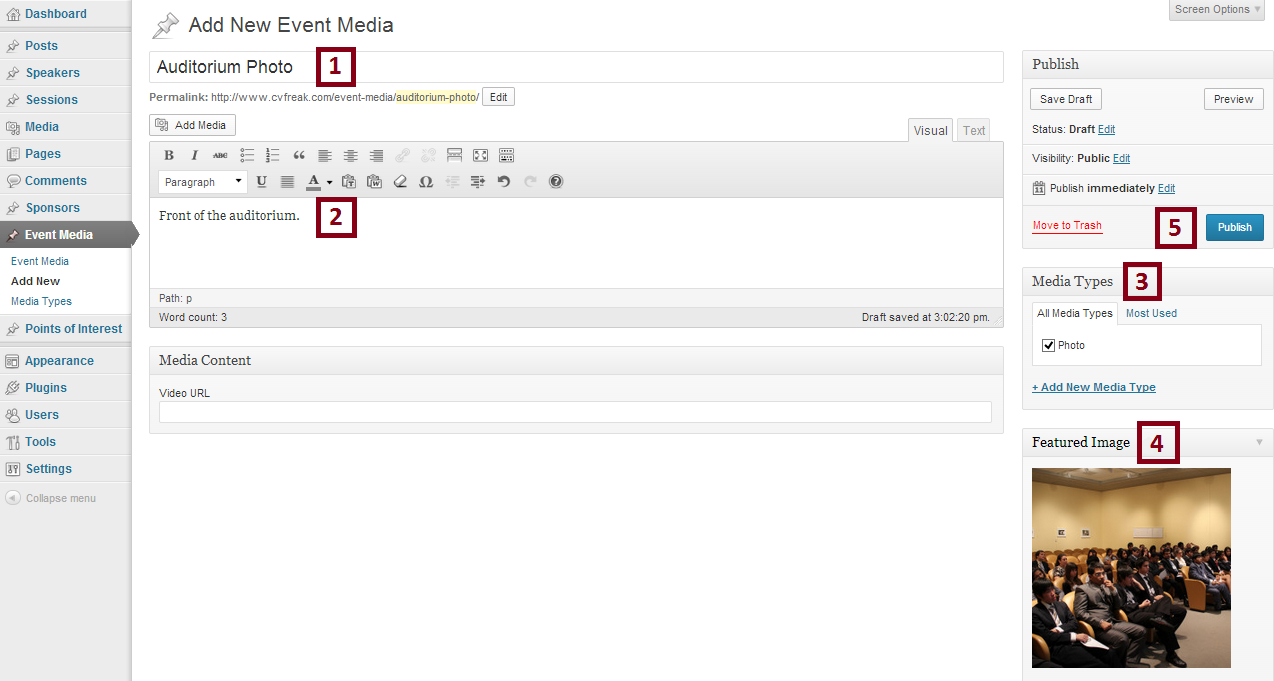
In this first example we are going to add a photo, so we will use the Featured Image.
Here is the information you have to provide:
1 “ Title: the name of the new Media.
2 “ Description: a description for the Media.
3 “ Media Types: add a new type for the Media, in this case for example “Photo”. Note Media types can also be different times of the event or whatever filter you want.
4 “ Featured Image: click on “Set featured image” to choose or upload the photo.
5 “ And of course, click on “Publish”
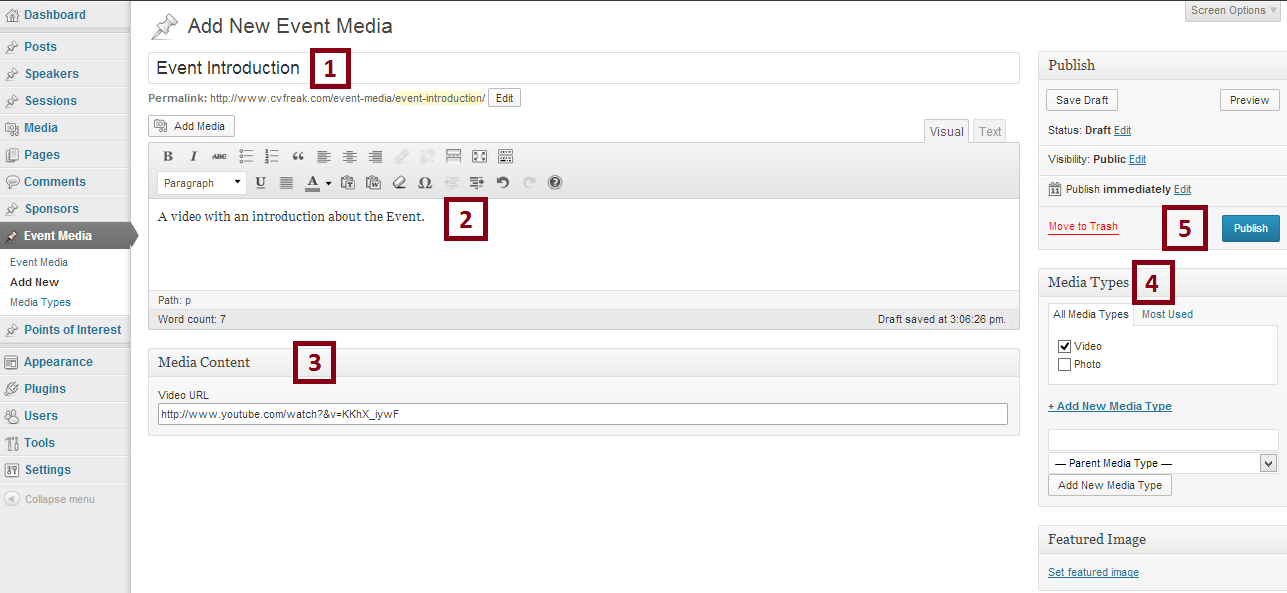
In this second example we are going to add a video, so we won’t use the Feature Image, instead we will use the Video URL field.
Here is the information you have to provide:
1 “ Title: the name of the new Media.
2 “ Description: a description for the Media.
3 “ Media Content: enter the URL for your video.
4 “ Media Types: add a new type for the Media, in this case for example “Video”.
5 “ And of course, click on “Publish”
So now if you come back to Dashboard>Event Media>Event Media you will see your new Medias in the list, as shown below:
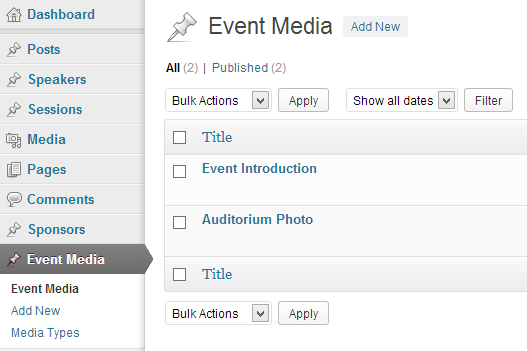
Repeat this simple process for every Event Media you want to show.
Click on the Images to enlarge
5.5 Posts
You are going to use Posts to let people know about the lastest news of your event. The last four posts will be displayed in the “Latest News Widget” in your homepage.
But first we will configure a few things:
1 “ Head to Settings->Permalinks. In “Common Settings” select “Post Name” and click on “Save Changes”.
2 “ Head to Posts-> Categories.Here Change the name of the default ‘Uncategorized’ category by clicking on ‘Edit’. Rename it to Blog or News or whatever taxonomy you prefer to call your Blog page and click “Update”.
So now, wherever you want it to link to all your posts, you can link to all your posts like this: http://yourdomain.com/category/blog
That’s all, now go to Dashboard>Posts. You may see a sample post called “Hello world!.
Place your mouse over and a some options will appear, click on Trash. We will delete this post to have our list of posts blank.
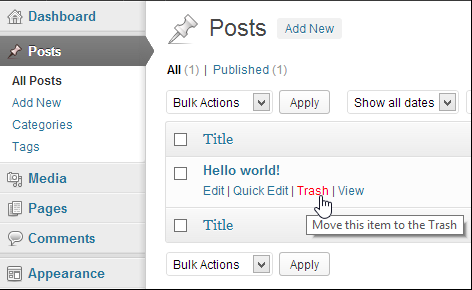
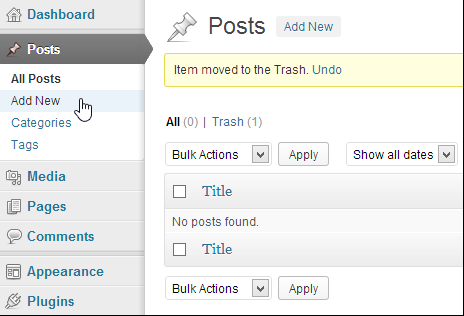
To create a new Post go to Dashboard>Posts>Add New.
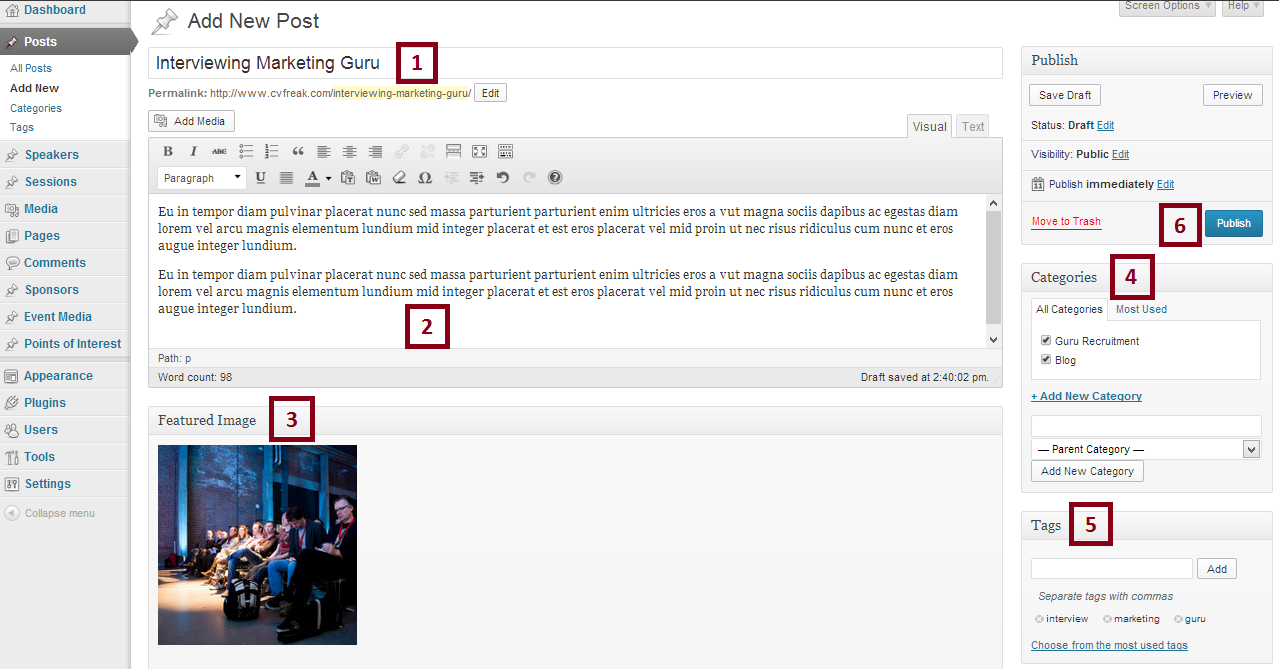
Here is the information you have to provide:
1 “ Title: enter a title for your new Post.
2 “ Description: enter the content of your Post. You can include some media if you want.
3 “ Featured Image: click on “Set featured image” to provide a picture to be displayed for this Post.
4 “ Categories: always select the default category ‘Blog’, so all your posts can be listed by the ‘Blog’ category. But besides create more categories if you want. Click on Add New Category and a field will appear to enter your category and then click on the “Add New Category” button. Your new category will appear above checked.
5 “ Tags: enter some tags for the post. If no tags have been provided yet, enter some separated by commas and click on “Add”. If they have, you can choose them from the Most Used Tags. Either way, Tags will appear below.
6 “ And of course, click on “Publish”
Click on the Images to enlarge
6. Setting Up The Homepage
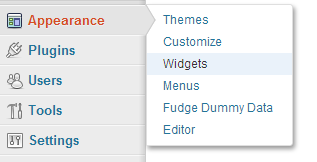
Please head to Appearance>Widgets.
Here your available widgets are shown. These can be dragged to two different areas of your website: the Homepage and the Blog. These areas are represented by the boxes at the right.
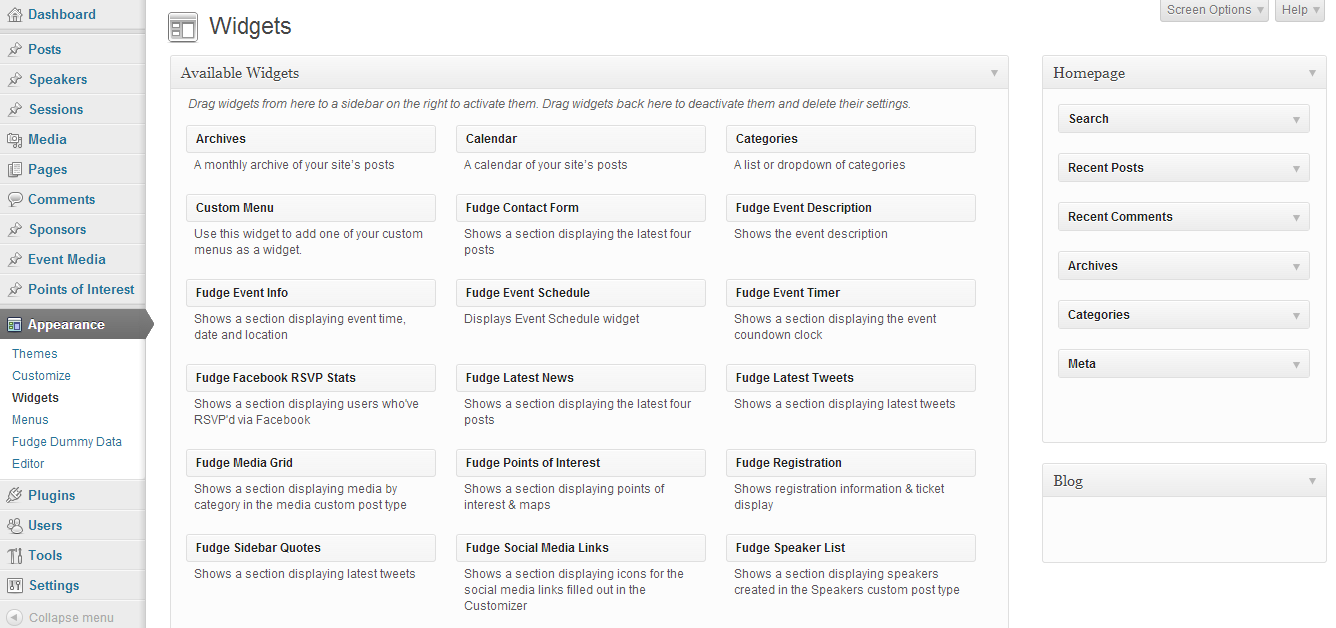
In this section we are going to describe you all the widgets that you can add to your homepage.
But first, clean your Homepage box of all the initial widgets.
Drag the widgets from the “Homepage” sidebar to the “Available Widgets” box to make them disappear, like this:
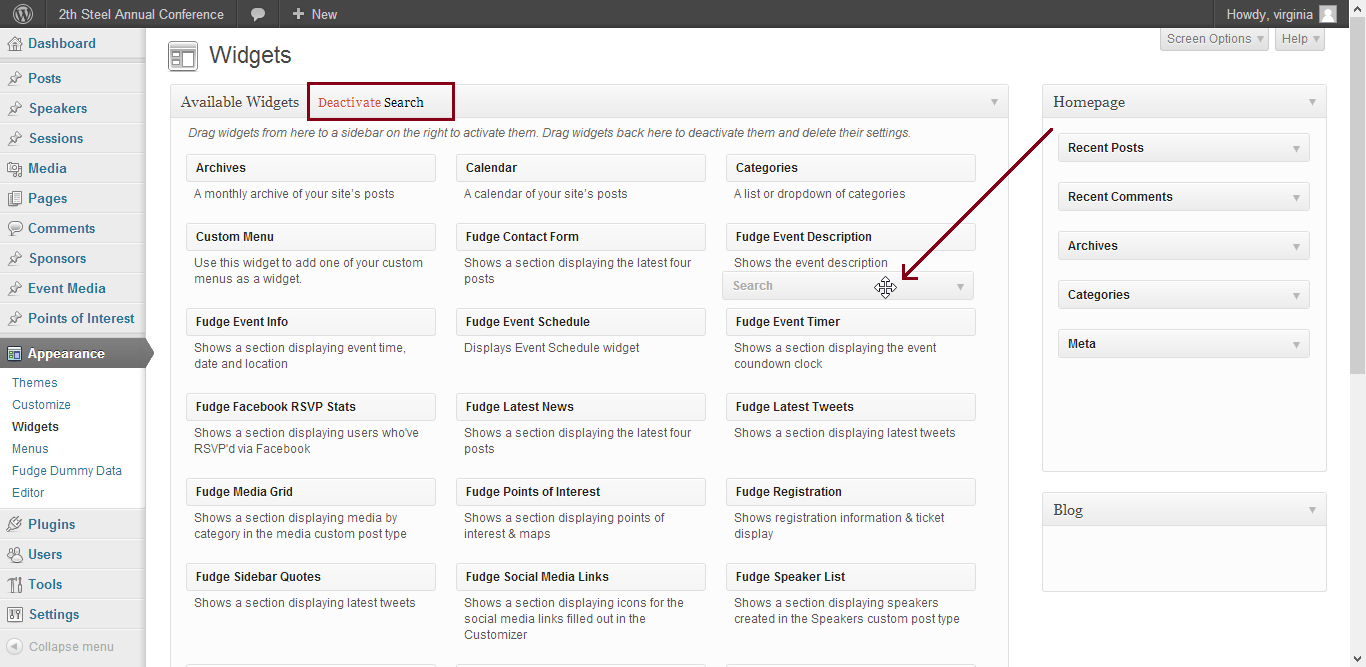
Repeat until your Homepage sidebar box is empty and go ahead to the following subsections where we will explain every Fudge Widget.
Click on the Images to enlarge
6.1 Fudge Event Info
The Fudge Event Info is a very beautiful widget that shows the when and where of your Event.
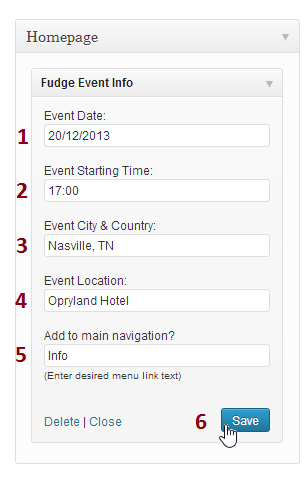
Drag a “Fudge Event Info” widget from the “Available Widgets” to the Homepage Sidebar, a number of options will appear:
Here is the information you have to provide:
1 “ Event Date: enter the date of your event.
2 “ Event Starting Time: provide the starting time.
3 “ Event City & Country: enter the city and country.
4 “ Event Location: enter the event location.
5 “ Add to Main Navigation?: if you want this section to be in the navigation provide a name, it will displayed in caps.
6 “ And of course, click on “Save” to save the settings.
Now that the Fudge Event Info has been succesfully configured and saved, let’s see how it shows in the homepage. Head to your wordpress site title and click on “Visit Site”.
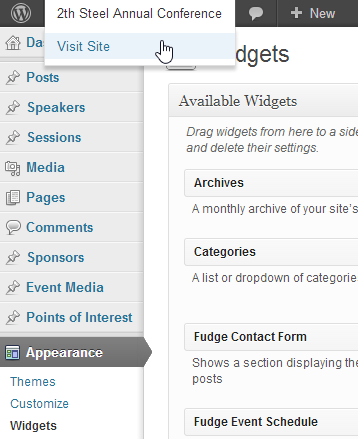
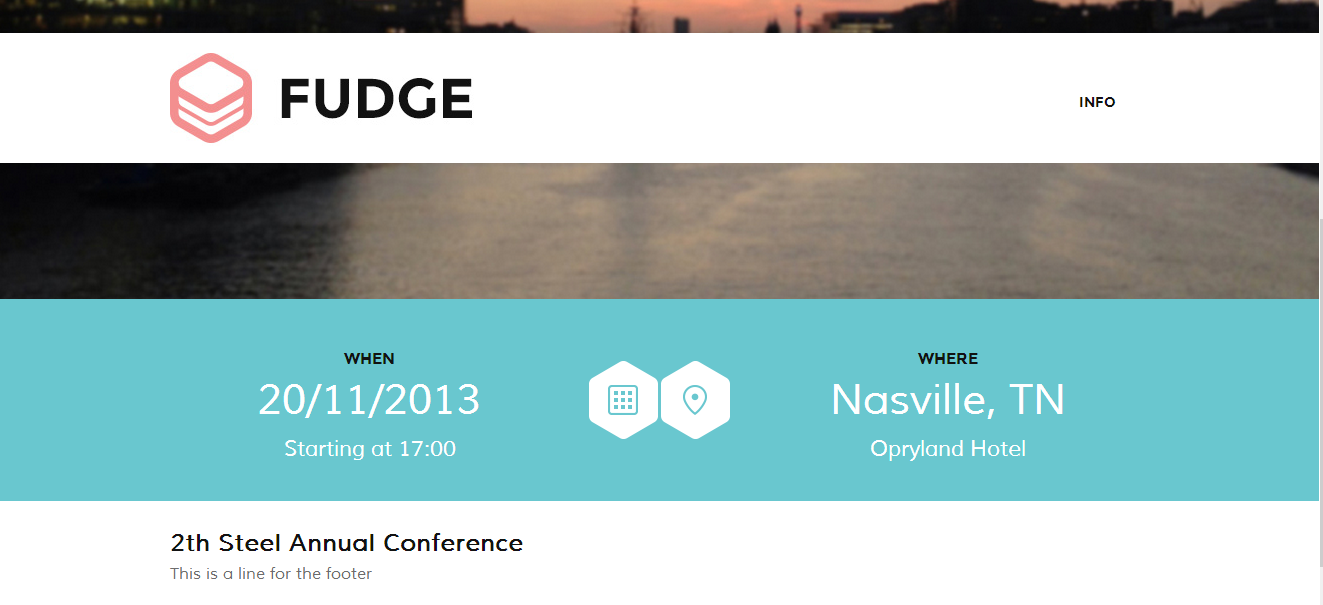
You should see the widget and the link “INFO” in the menu since whe gave this name in the “Add to Main Navigation?” field.
Click on the Images to enlarge
6.2 Fudge Event Description
The Fudge Event Description widget shows a description of your event.
Drag a “Fudge Event Description” widget from the “Available Widgets” to the Homepage Sidebar.
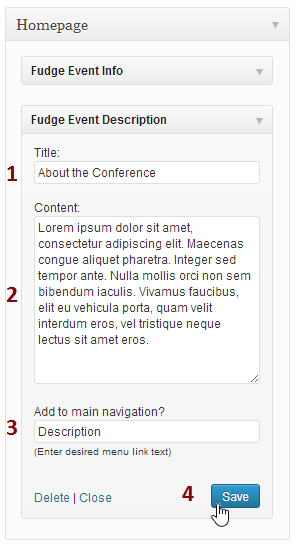
Here is the information you have to provide:
1 “ Title: enter a title for your description widget.
2 “ Content: enter the description of your event.
3 “ Add to Main Navigation?: if you want this section to be in the navigation provide a name.
4 “ And of course, click on “Save” to save the settings.
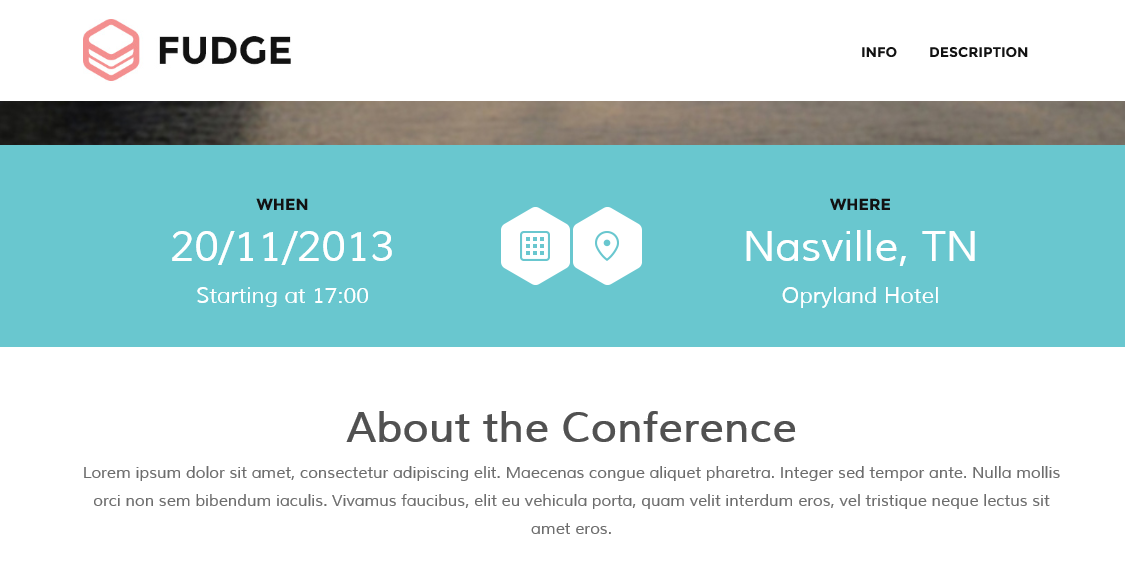
Now that the Fudge Event Description widget has been succesfully configured and saved, let’s see how it shows in the homepage. Head to your wordpress site title and click on “Visit Site”.

You should see the widget and the link “DESCRIPTION” in the menu because we filled the “Add to Main Navigation?” field.
Click on the Images to enlarge
6.3 Fudge Speaker List
This widget shows the Speakers of your event in rows of four. If they are too many a button to see more Speakers will appear.
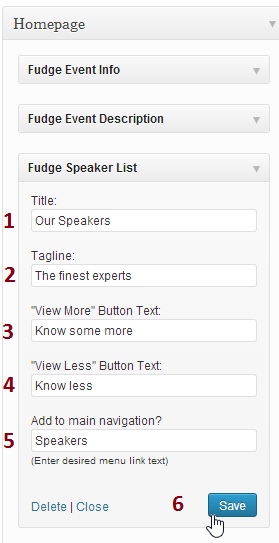
Drag a “Fudge Speaker List” widget from the “Available Widgets” to the Homepage Sidebar.
Here is the information you have to provide:
1 “ Title: enter a title for your description widget.
2 “ Tagline: enter the description of your event.
3 “ “View More” Button Text: enter the text for the button to show more Speakers.
4 “ “View Less” Button Text: enter the text for the button to show less Speakers.
5 “ Add to Main Navigation?: if you want this section to be in the navigation provide a name.
6 “ And finally, click on “Save” to save the settings.
Now that the Fudge Speaker List widget has been configured and saved, let’s see how it shows in the homepage. Head to your wordpress site title and click on “Visit Site”.

You should see the widget and the link “SPEAKERS” in the menu since whe gave this name in the “Add to Main Navigation?” field.
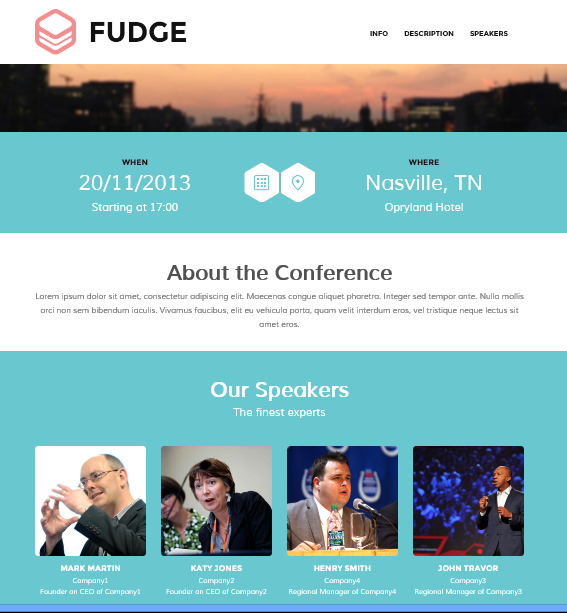
If no Speakers are showing, maybe you haven’t created any Speaker yet, see how to create a Speaker in Speakers.
Click on the Images to enlarge
6.4 Fudge Event Schedule
With this widget you will be able to show your event schedule. Click on a day to load the sessions, start and end times and speakers involved.
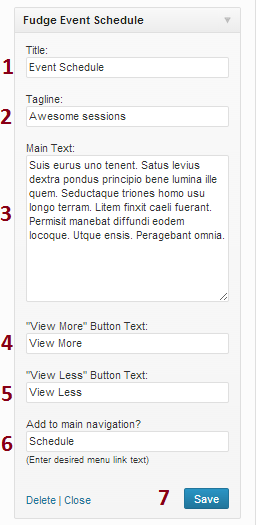
Drag a “Fudge Event Schedule” widget from the “Available Widgets” to the Homepage Sidebar.
Here is the information you have to provide:
1 “ Title: enter a title for your Schedule widget.
2 “ Tagline: enter a tagline for your Schedule widget.
3 “ Main Text: use this field to enter a main text before displaying the Schedule.
4 “ “View More” Button Text: enter the text for the button that shows more Sessions for a certain day.
5 “ “View Less” Button Text: enter the text for the button that shows less Sessions for a certain day.
6 “ Add to Main Navigation?: if you want this section to be in the navigation provide a name.
7 “ And finally, click on “Save” to save the settings.
Now that the Fudge Event Schedule widget has been configured and saved, let’s see how it shows in the homepage. Head to your wordpress site title and click on “Visit Site”.

You should see the widget and the link “SCHEDULE” in the menu since whe gave this name in the “Add to Main Navigation?” field.
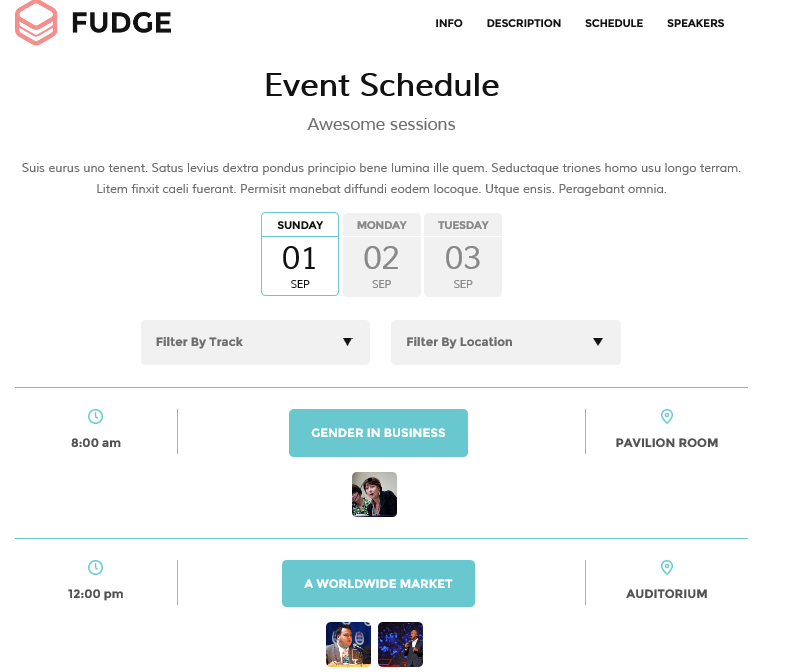
If no Sessions are showing, remember how to create a Session in Sessions.
Click on the Images to enlarge
6.5 Fudge Registration
Allow your attendees to register and buy your event tickets with this Registration Widget.
The Fudge Registration widget is prepared for Eventbrite, Xing Events and Event Espressoregistration services.
You can try a script from other registration services but we won’t guarantee it will display properly on the site.
You can obtain the embed code from Eventbrite, see how to in Registration Services: Eventbrite.
You can find more information about using Xing Events in Registration Services: Xing Events.
You can find more information about using EventEspresso in Registration Services: EventEspresso.
Once you have the embed code, drag a “Fudge Registration” widget from the “Available Widgets” to the Homepage Sidebar.
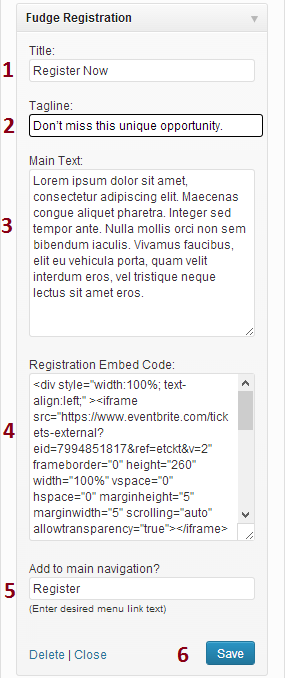
Here is the information you have to provide:
1 “ Title: enter a title for your registration widget.
2 “ Tagline: enter a tagline if you wish.
3 “ Main Text: enter a more detailed information about the registration or tickets.
4 “ Registration Embed Code: here insert the code from your tickets service.
5 “ Add to Main Navigation?: if you want this section to be in the navigation provide a name.
6 “ And finally, click on “Save” to save the settings.
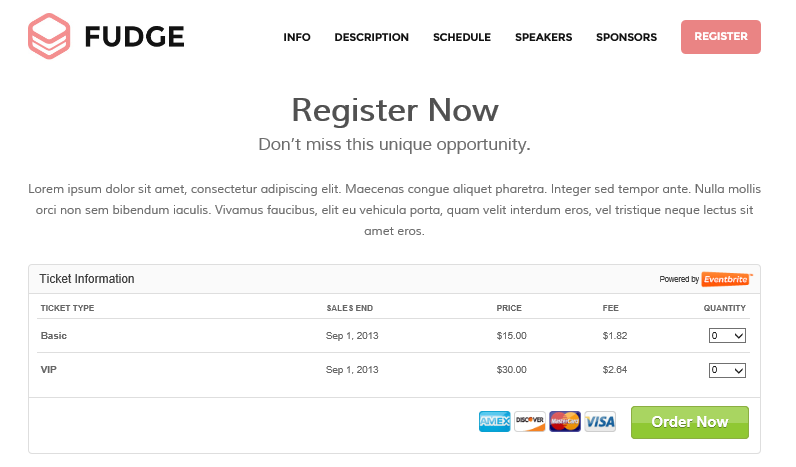
Now that the Fudge Registration widget has been configured and saved, let’s see how it shows in the homepage. Head to your wordpress title and click on “Visit Site”.

An Eventbrite embed code has been used. You should see the widget and the link “REGISTER” in the menu since whe gave this name in the “Add to Main Navigation?” field.
Click on the Images to enlarge
6.6 Sponsors List
This widget shows the Sponsors of your event.
Drag a “Fudge Sponsors List” widget from the “Available Widgets” to the Homepage Sidebar.
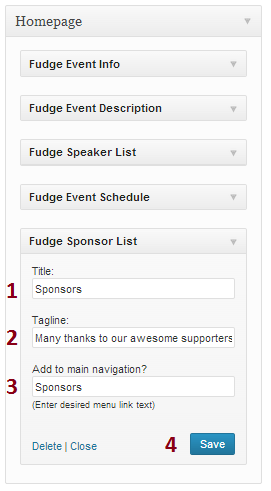
Here are the steps to set up the widget:
1 “ Title: enter a title for your sponsors widget.
2 “ Tagline: enter a tagline for your sponsors widget.
3 “ Add to Main Navigation?: if you want this section to be in the navigation provide a name for the link.
4 “ And finally, click on “Save” to save the settings.
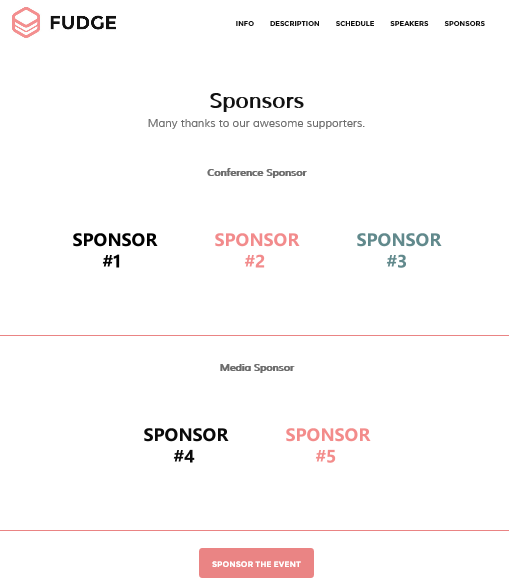
Now that the Fudge Sponsors List widget has been configured and saved, let’s see how it shows in the homepage. Head to your wordpress title and click on “Visit Site”.

The Sponsors appear divided according to the tiers defined. You should see the widget and the link “SPONSORS” in the menu since whe gave this name in the “Add to Main Navigation?” field.
If no Sponsors show, maybe you haven’t created any Sponsor yet, see how to create a Sponsor in Sponsors.
Click on the Images to enlarge
6.7 Fudge Latest News
This widget displays the last four posts published.
Drag a “Fudge Lastest News” widget from the “Available Widgets” to the Homepage Sidebar.
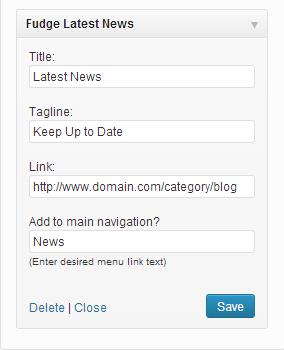
Here is the information you have to provide:
1 “ Title: enter a title for your News widget.
2 “ Tagline: enter a tagline for your News widget.
3 “ Link: enter a link to your blog page or posts by category. A button “View All News” will lead there.
4 “ Add to Main Navigation?: if you want this section to be in the navigation provide a name for the link.
5 “ And finally, click on “Save” to save the settings.
Now that the Fudge Latest News widget has been configured and saved, let’s see how it shows in the homepage. Head to your wordpress site title and click on “Visit Site”.

You should see the widget and the link “NEWS” in the menu since whe gave this name in the “Add to Main Navigation?” field.
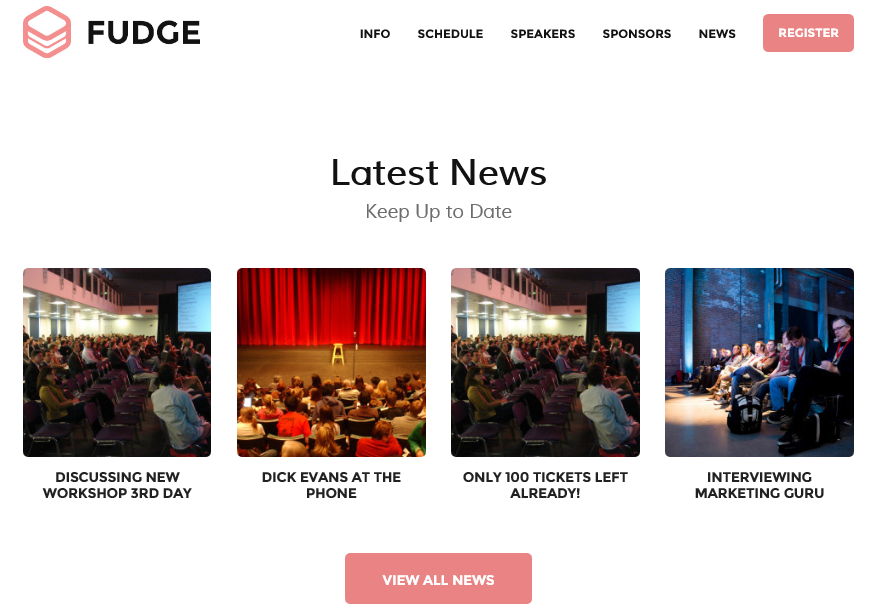
If no News are showing, remember how to create Posts.
Click on the Images to enlarge
6.8 Fudge Latests Tweets
This widget will display the latest tweets for your event hashtag.
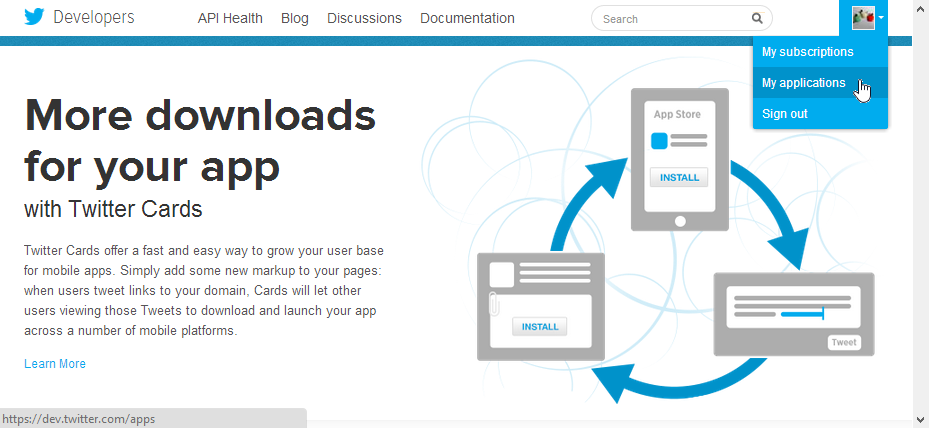
In order to use it, first we have to create a Twitter Application, go to the dev.twitter.com website.
Log in with your Twitter Account. Hover over your profile image and select “My applications”.
.
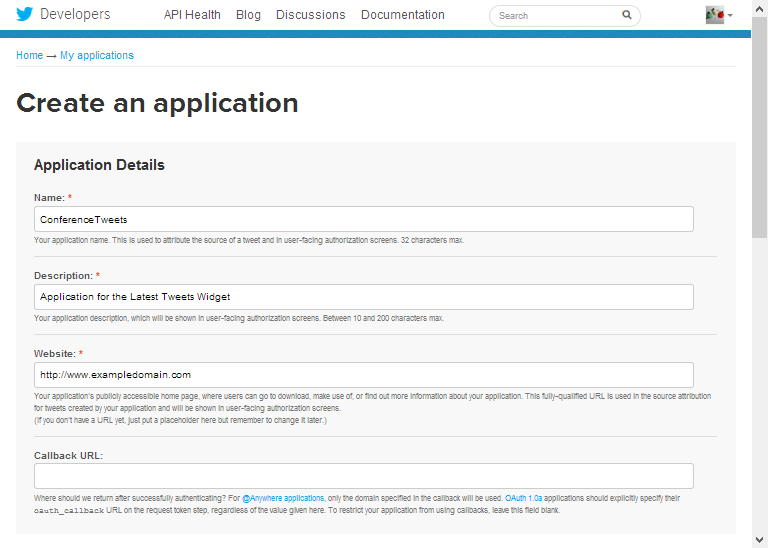
Click on the button “Create a new application”.
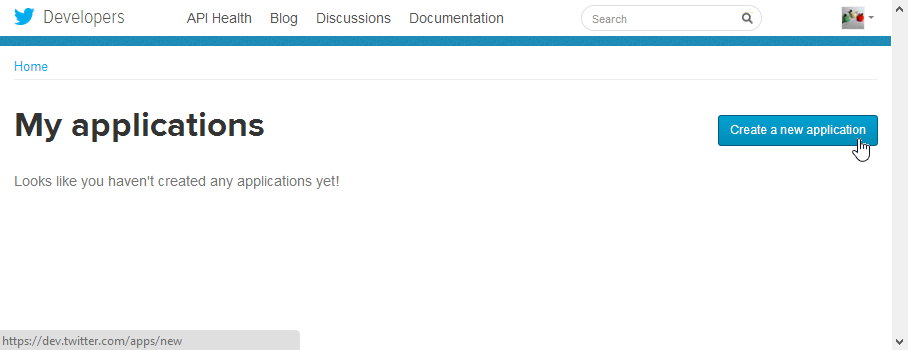
Enter the following information: Name, Description and Website. Then Accept the Rules and click on the button “Create your Twitter application”.
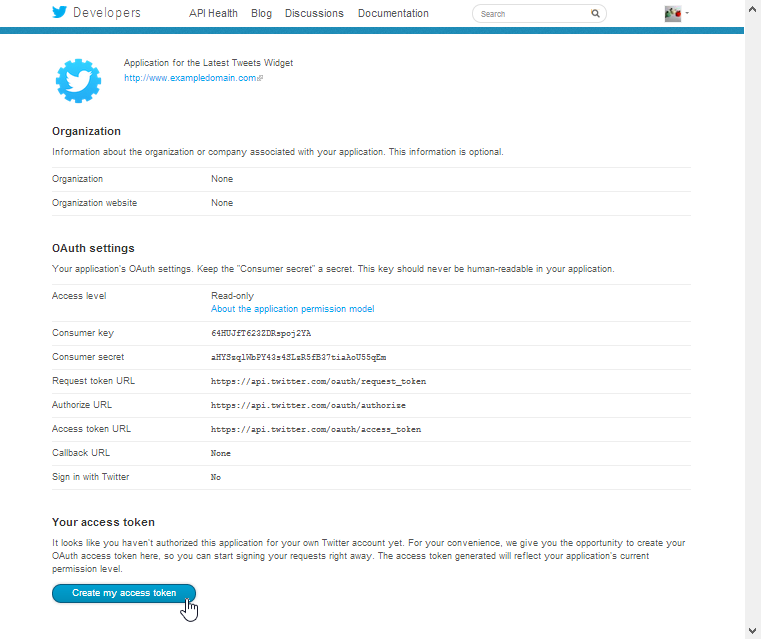
The new application has been created. At the bottom you will see a section labeled “your access token”. Click on the “Create my access token” button, and an authorized accesss token and secret will be generated for your account and the current application. We are going to need these values for our widget.
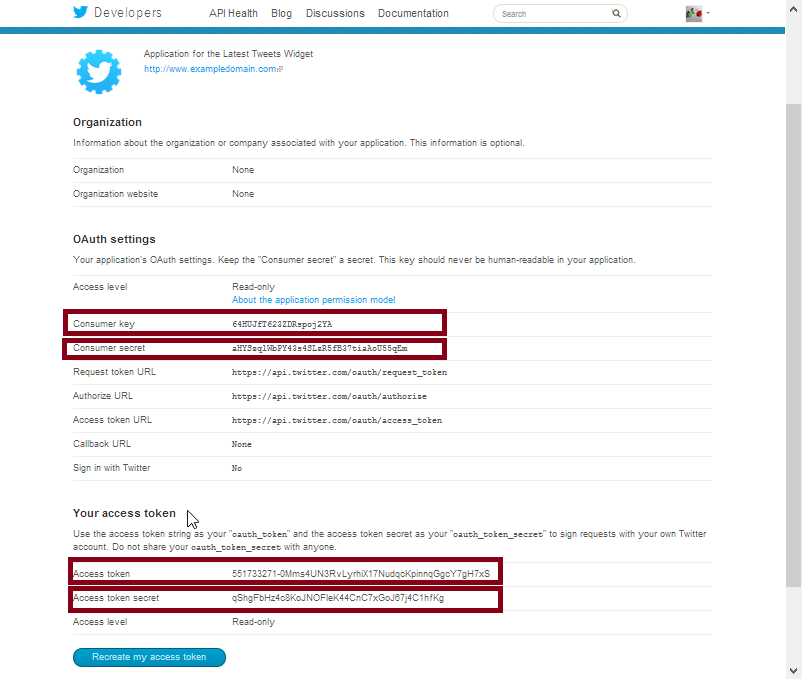
Now that the token has been generated, these are the values we need. Don’t share your Consumer secret and Access Token Secret. The values in the snapshots are just an example, you need your own generated values.
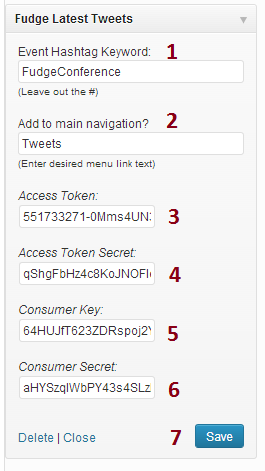
So now, coming back to our WordPress site, head to Dashboard>Appearance>Widgets and drag a “Fudge Latest Tweets” widget from the “Available Widgets” to the Homepage Sidebar.
Here is the information you have to provide:
1 “ Event Hashtag Keyword: enter the hashtag for your event, without the #.
2 “ Add to Main Navigation?: if you want this section to be in the navigation provide a name for the link.
3 “ Access Token: copy the Access Token value and paste it here.
4 “ Access Token Secret: copy the Access Token Secret value and paste it here.
5 “ Consumer Key: copy the Consumer value and paste it here.
6 “ Consumer Secret: copy the Consumer Secret value and paste it here.
7 “ And finally, click on “Save” to save the settings.
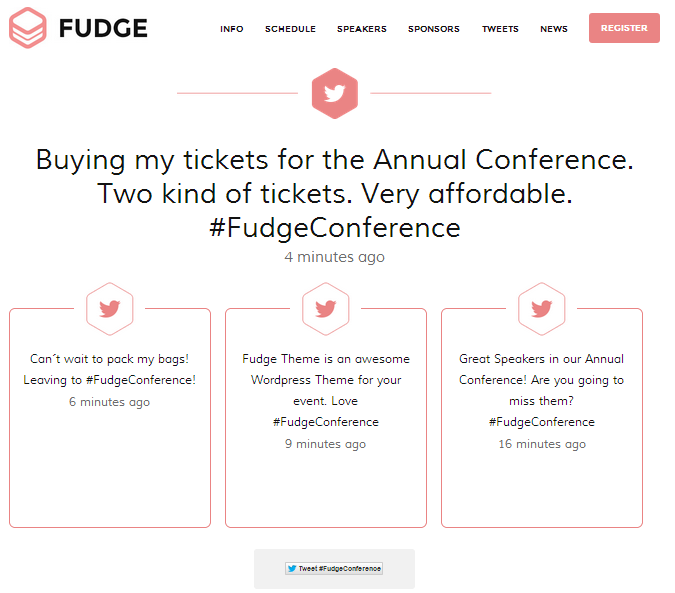
Now that the Fudge Latest Tweets widget has been configured and saved, it will show the latest tweets containing your event hashtag. If no tweets have been posted with your event hashtag it will be empty so, we have published some tweets with our sample hashtag, to show you how it will look. Head to your wordpress title and click on “Visit Site”.

You should see some tweets and the link “TWEETS” in the menu since whe gave this name in the “Add to Main Navigation?” field.
Click on the Images to enlarge
6.8.1 Twitter Wall Page
If you are logged in as an admin you can see a ‘View in FullScreen’ button, this gives a full Twitter wall to use the day of the event. We deactivated it for not logged in users to avoid loading the Twitter API too many times. Refresh rates are dictated by Twitter and are devised to optimise the display without getting errors.
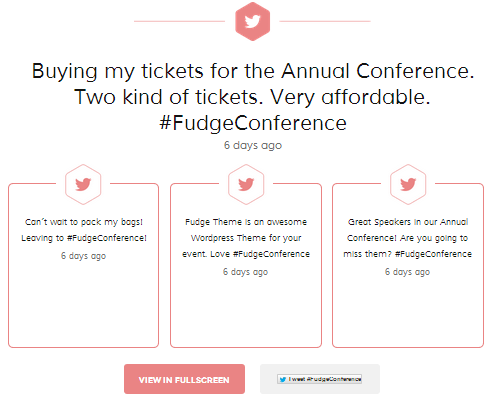
In order to use it, you need to create a page with a Twitter Full Template.
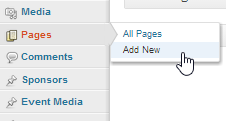
Head to Pages. Create New.
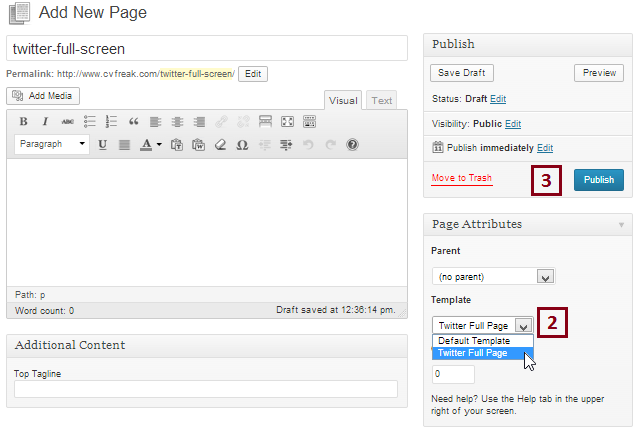
Here is the information you have to provide:
1 “ Title: enter twitter-full-screen for the title, as this is the name expected.
2 “ Template: choose the Twitter Full Page.
3 “ And finally, click on “Publish” to publish the page.
Now a full page with the tweets appear when clicked on the “View in FullScreen” button.
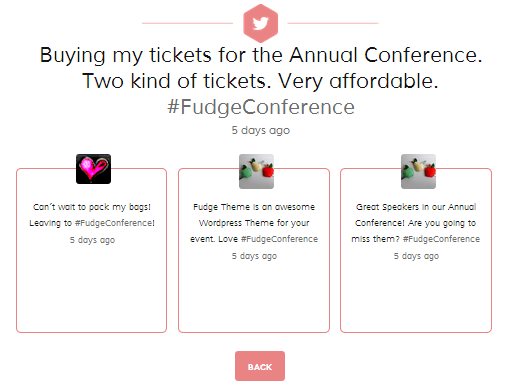
Click on the Images to enlarge
6.9 Fudge Points of Interest
Allow your event attendees to take a look at the most relevant points of interest with this map widget.
Drag a “Fudge Points of Interest” widget from the “Available Widgets” to the Homepage Sidebar.
Here is the information you have to provide:
1 “ Main Title: enter a main title for the widget.
2 “ Secondary Title: enter a secondary title for the widget.
3 “ Tagline: include a tagline for the widget.
4 “ Add to Main Navigation?: if you want this section to be in the navigation provide a name for the link.
5 “ And finally, click on “Save” to save the settings.
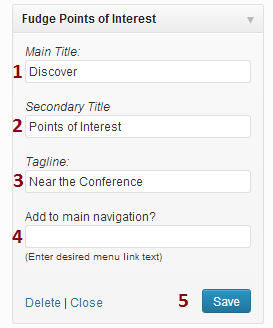
Now that the Fudge Points of Interest widget has been configured and saved, let’s see how it shows in the homepage. Head to your wordpress site title and click on “Visit Site”.

You should see your Points of Interest displayed in the map. A link to each one of them centers the Point of Interest in the Map. Click on a Point of Interest to see its details.
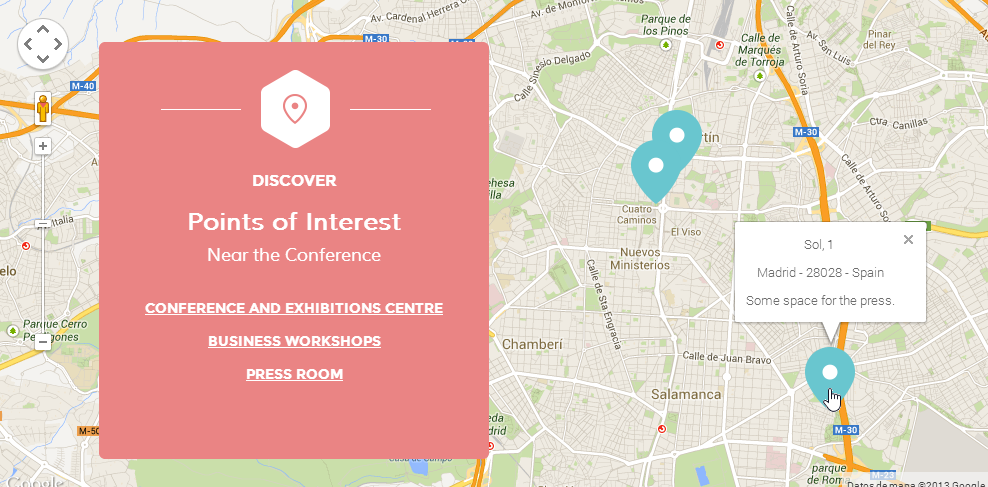
If no Points of Interest are showing, remember how to create Points of Interest.
Click on the Images to enlarge
6.10 Fudge Contact Form
With this widget you will be able to show a contact form.
Drag a “Fudge Contact Form” widget from the “Available Widgets” to the Homepage Sidebar.
Here is the information you have to provide:
1 “ Title: enter a title for your contact form.
2 “ Tagline: enter a tagline for your contact form.
3 “ Email Address To Send Forms To: enter the email address where the messages will be sent to.
4 “ Recaptcha Public Key: Recaptcha Public Key goes here. {Fudge uses Google Recaptcha to avoid getting your email flooded with spam. Here is a tutorial on how to obtain a public and private key.)
5 “ Recaptcha Private Key: Enter your private key here.
6 “ Add to Main Navigation?: if you want this section to be in the navigation provide a name for the link.
7 “ And finally, click on “Save” to save the settings.
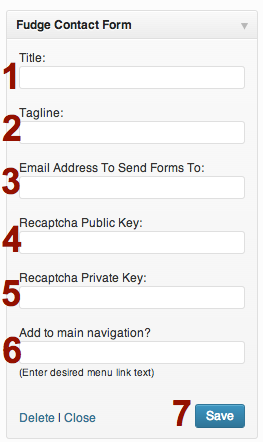
Now that you have saved your settings, let’s see how the contact form shows in the homepage. Head to your wordpress title and click on “Visit Site”.

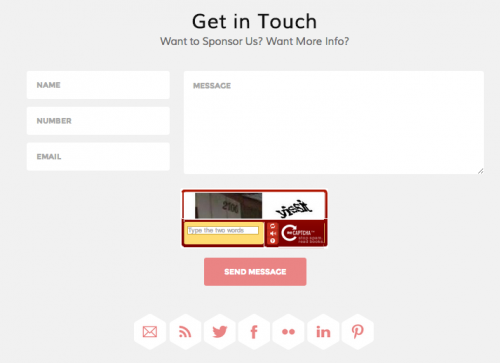
You should see the contact form widget. The form displays contact fields (Name, Number, Email) and a message field (Message).
Name, Email and Message are mandatory fields.
When clicking the “Send Message” button an email will be sent to the email address we provided to the widget.
Also the social media buttons are shown below.
Click on the Images to enlarge
6.11 Fudge Social Media Links
This widget displays all your social media links.
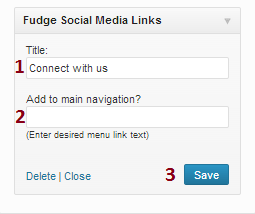
Drag a “Fudge Social Media Links” widget from the “Available Widgets” to the Homepage Sidebar.
Here is the information you have to provide:
1 “ Title: enter a title for Social Media widget.
2 “ Add to Main Navigation?: if you want this section to be in the navigation provide a name for the link or leave it blank.
3 “ And finally, click on “Save” to save the settings.
Now that the Fudge Social Media Links widget has been configured and saved, let’s see how it shows in the homepage. Head to your wordpress title and click on “Visit Site”.

The widget displays a series of buttons with links to your social media profiles.
Remember these are set in the Customize Social Media & Connecting section.

Click on the Images to enlarge
6.12 Fudge Event Timer
With the Fudge Event Timer a countdown for your event will be displayed.
Drag a “Fudge Event Timer” widget from the “Available Widgets” to the Homepage Sidebar.
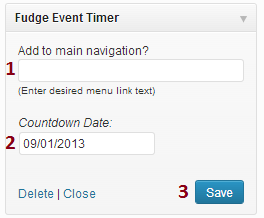
Here is the information you have to provide:
1 “ Add to Main Navigation?: if you want this section to be in the navigation provide a name for the link or leave it blank.
2 “ Countdown Date: enter the date of your event.
3 “ And finally, click on “Save” to save the settings.
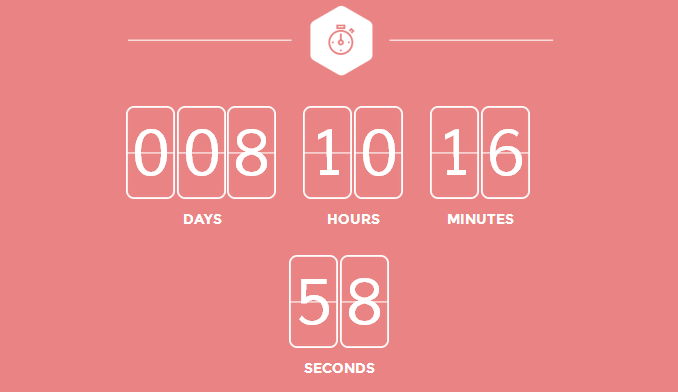
Now that the Fudge Event Timer widget has been configured and saved, let’s see how it shows in the homepage. Head to your wordpress title and click on “Visit Site”.

This nice countdown clock displays the remaining time for your event.
Click on the Images to enlarge
6.13 Fudge Media Grid
This widgets displays your Event Media in a gallery.
Drag a “Fudge Media Grid” widget from the “Available Widgets” to the Homepage Sidebar.
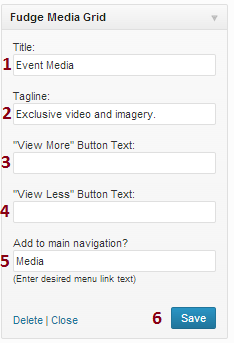
Here is the information you have to provide:
1 “ Title: enter a title for your Media Grid.
2 “ Tagline: enter a tagline for your Media Grid.
3 “ “View More” Button Text: specify an alternative label for the “View More” button if you want.
4 “ “View Less” Button Text: specify an alternative label for the “View Less” button if you want.
5 “ Add to Main Navigation?: if you want this section to be in the navigation provide a name for the link or leave it blank.
6 “ And finally, click on “Save” to save the settings.
Now that the Fudge Media Grid widget has been configured and saved, let’s see how it shows in the homepage. Head to your wordpress title and click on “Visit Site”.

Media items can be filtered by Media Type. In this case you can see all media, photo media or video media. By clicking on the media you can obtain more detailed information.
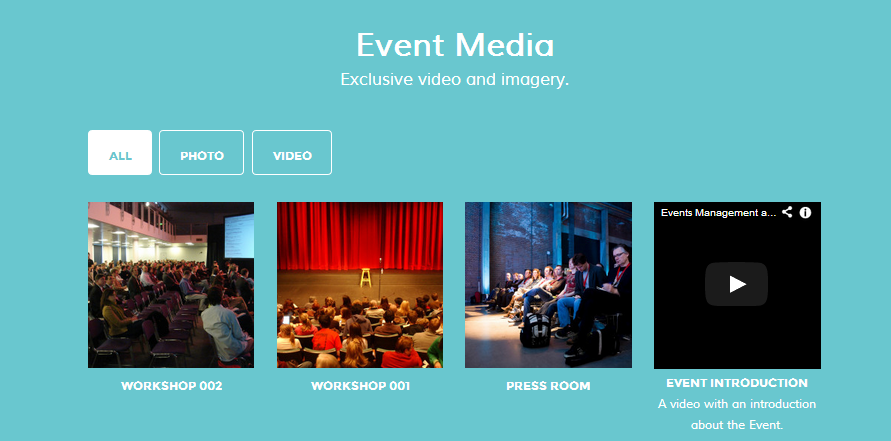
If no media shows this means you have to add some media through the Event Media dashboard section, see Event Media.
Click on the Images to enlarge
6.14 Fudge Facebook Stats
This widget will display your Facebook Event RSVP Stats.
In order to use it, first we have to create a Facebook Application, start by going to https://developers.facebook.com/apps website.
Log in with your Facebook Account. Click on “Create New App” button.
.
Fill in the App Name and App Category. Leave the App Namespace blank, and don’t tick the Web Hosting check. Click on Continue.
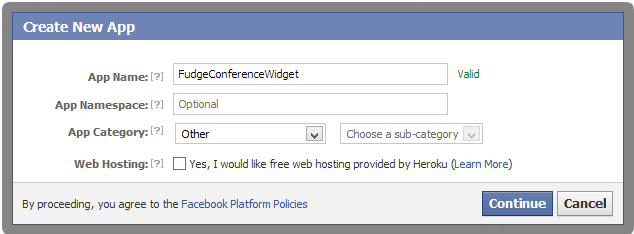
Enter the required captcha and click on Continue.
Now you should have been redirected to the Application page. The fields we need, the App ID and the App Secret are already there. Just click on the “Sandbox Mode” Disabled radio button to get the App off of the Sandbox Mode and click on the “Save Changes” button.
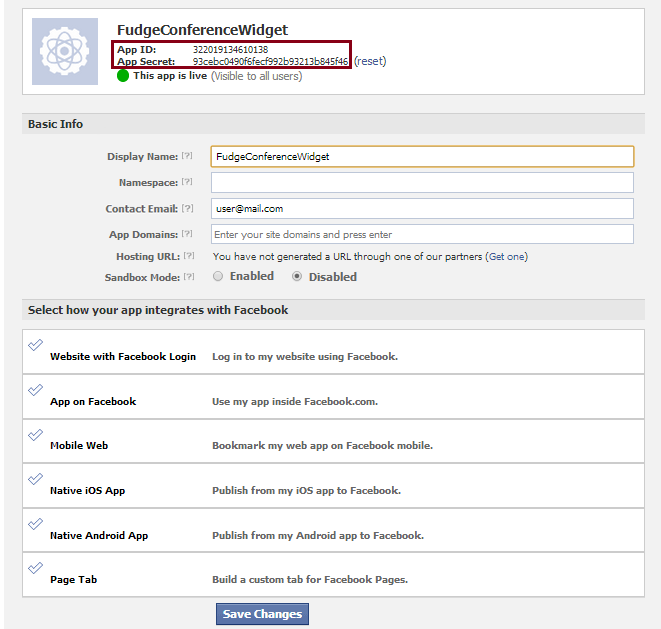
Come back to WordPress now. Head to Appearence>Widgets again. Drag a “Fudge Facebook RSVP Stats” widget from the “Available Widgets” to the Homepage Sidebar.
Here is the information you have to provide:
1 “ Link to Event on Facebook: enter the url of your Facebook Event page.
2 “ Add to Main Navigation?: if you want this section to be in the navigation provide a name for the link or leave it blank.
3 “ Event ID: it’s the number code at the end of your Facebook Event page.
4 “ App ID: copy the App ID value Facebook generated and paste it here.
5 “ Secret Key: copy the Secret Key value Facebook generated and paste it here.
6 “ And finally, click on “Save” to save the settings.
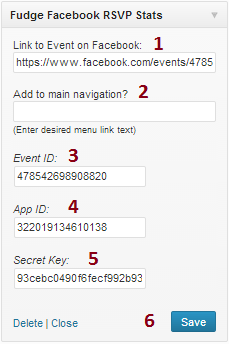
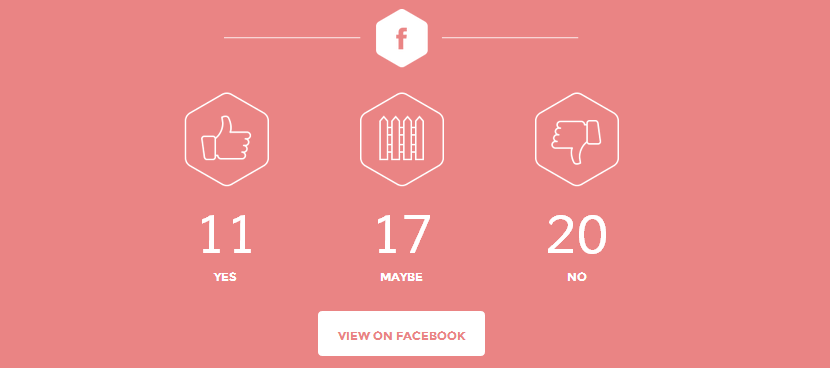
The Facebook RSVP Stats widget is set up and saved, so let’s see how it shows in the homepage. Head to your wordpress title and click on “Visit Site”.

The widget displays those people who has confirmed, rejected or maybe attending your event. The button “View in Facebook” leads to your Facebook Event Page.
Click on the Images to enlarge
7. Editing Blog Sidebar Widgets
Please Head to Appearance-> Widgets
There is a Blog sidebar box where you can drag widgets too. This widgets will appear in your Posts pages to the right.
7.1 Fudge Sidebar Quotes
With this widget you can define a pair of quotes and display them in your posts pages.
Drag a “Fudge Sidebar Quotes” widget from the “Available Widgets” to the Blog Sidebar.
Here is the information you have to provide:
1 “ Text: enter the text of the quote.
2 “ Time: enter the time of the quote.
3 “ And finally, click on “Save” to save the settings.
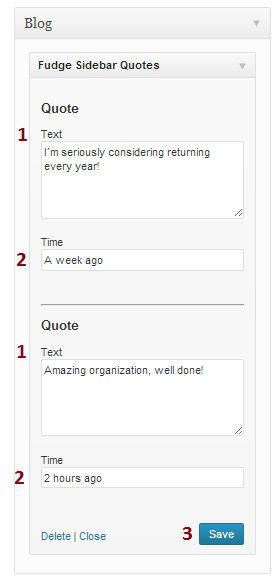
Now that the Fudge Sidebar Quotes widget has ben configured and saved, let’s see how it shows in the homepage. Head to Dashboard>Posts, hover over a post an click on View.
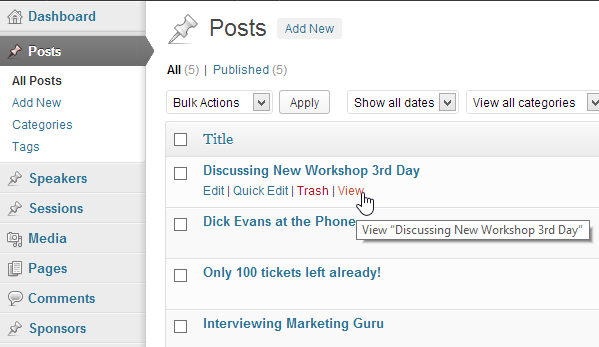
The quotes are displayed at the right side of the blog post.
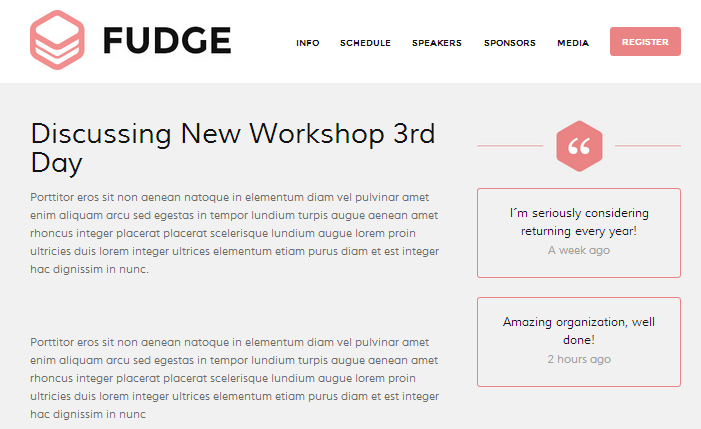
Click on the Images to enlarge
7.2 Other Sidebar Widgets
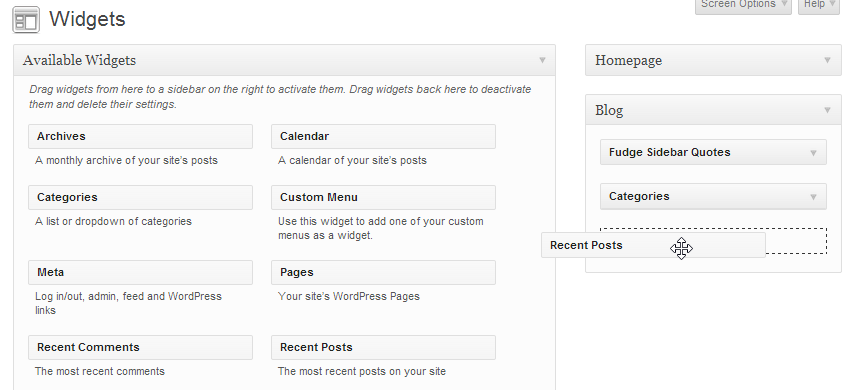
You can add your favourite wordpress widgets to the blog sidebar too. As usual, just drag the widget, set it up and click on Save.
Click on the Images to enlarge
8. Editing the Style
You may make some changes in the theme styles. The stylesheets are located in the wp-content/themes/fudge/css/schemes/ folder of your wordpress installation.
9. Registration Services
This section will give you some information to help you set up the registration services and integrate them with your Fudge Theme.
Learn how to set up your tickets in Eventbrite or amiando
9.1 Eventbrite
You can obtain the embed code from Eventbrite by creating an event and tickets at www.eventbrite.com.
1- Create an event.
2- Use the “Invite & Promote” option. Choose “Website Integrations”.
3- Click on “Show me”.
4- Click on “Embedded on the page with your content” > Embed Code. Copy the code inside.
5- Paste the code in your WordPress site. Go to Dashboard > Appearance > Widgets
Use the “Fudge Registration” widget on the “Homepage” widget area. You should include the code on “Registration Embed Code” (do not forget to click on “Save”)
Back To Fudge Registration Widget
Back To Top
9.2 Xing Events
Xing Events, here refereed as amiando (its previous name) is an online event registration and ticketing service.
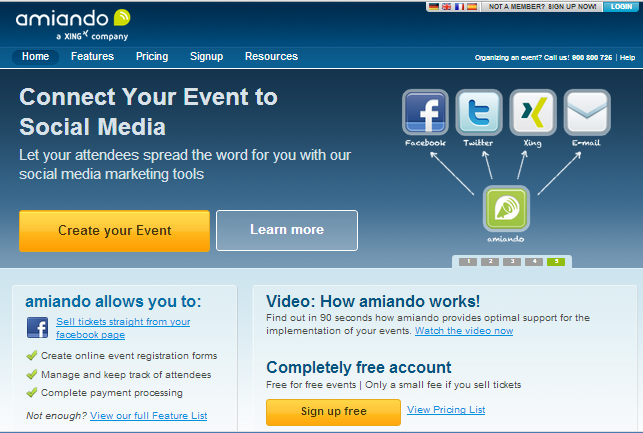
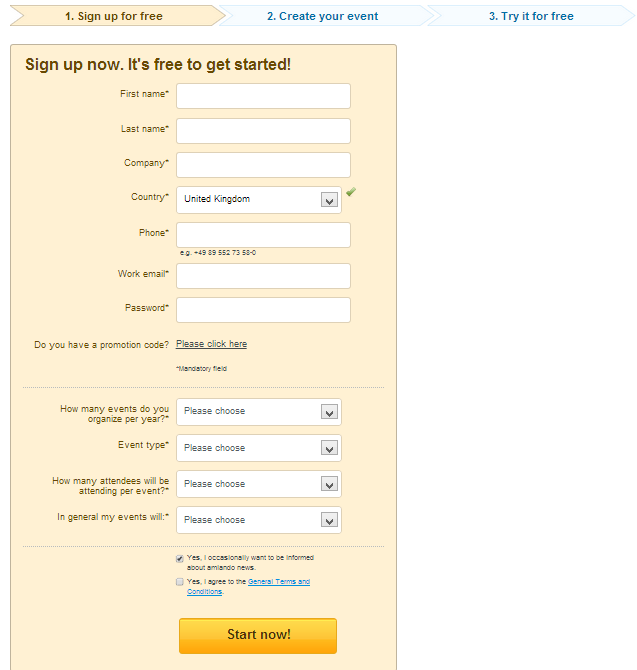
Fill in the following information to sign up in Amiando, and click on “Start Now!”.
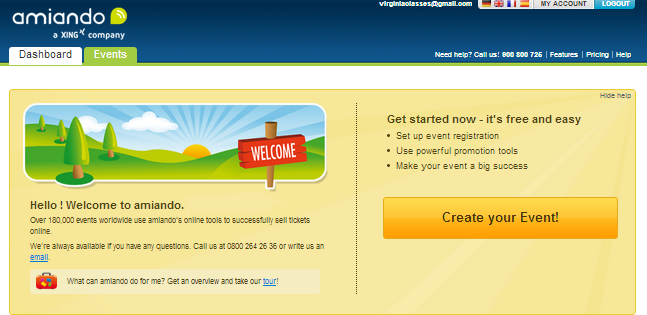
Your dashboard will appear. Click on “Create your Event!”.
In the New Event Page you will have to provide the following information:
1 “ Event Title: enter your event name here. You can also add a short description of your event.
2 “ Date: enter the start and end date of your event.
3 “ Venue description: enter the specific address of your event. A Google Map will appear on the right showing the location.
4 “ Categories: add one or more categories (tickets) for the event. You can set the categories as well as the number of available places per category and the price. Click on “add a new category” if you have more than one.
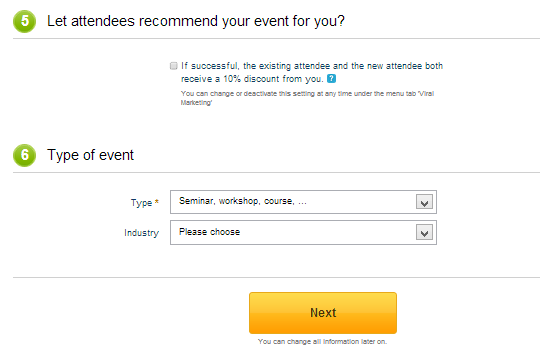
5 “ Let attendees recommend your event for you?: if checked, ticket buyers can recommend your event and benefit from a 10% ticket discount.
5 “ Type of Event: determine the type of event. Depending on the type a ticket sale or a registration form will be selected.
6 “And finally, click on “Next”.

Your event is now in a draft mode. You can do all kind of tests and click on “Activate event” when ready.
You should use the Ticket Sale presentation. You can only switch between a registration form and a ticket sale while your event is in the draft mode.
If you see the option “Switch to Registration Form” means you have the Ticket Sale and you’re fine.
Click on Integration. Here check the module dropdown shows “Order tickets (Ticket sales) and copy the HTML code.
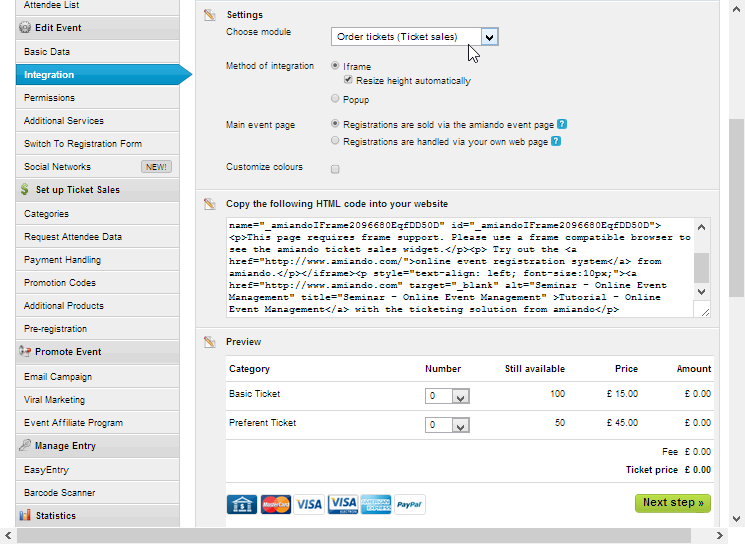
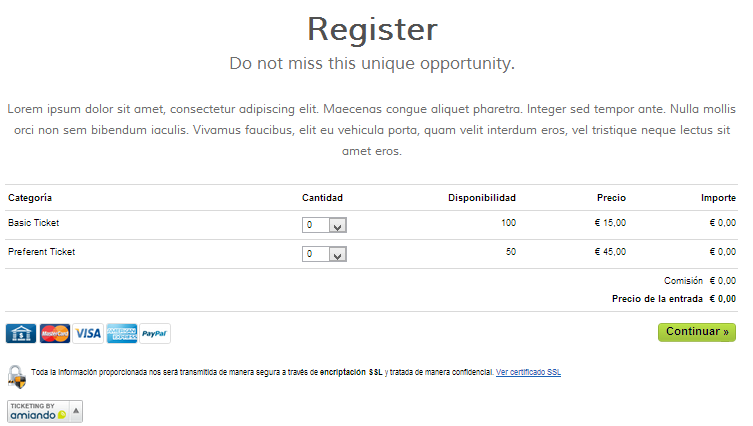
Paste it in the “Registration Embed Code” field of Fudge Registration Widget.
This would be the result:
Click on the Images to enlarge
9.3 EventEspresso
Fudge works great with EventEspresso. EventEspresso is a WordPress plugin which allows you to handle event registration and ticketing on your own site. To use EventEspresso with Fudge you will need to purchase it from EventEspresso.com.
Please note that Fudge only supports version 4.0 Beta and above. Also note that the above integration will only include the display of the ticket selector shortcode. More advanced integration will require custom development.
Once you have purchased and downloaded EventEspresso, you will need to install and activate it. Here is quick guide on how to install and activate EventEspresso.
After installing Event Espresso, the first thing you need to do is to choose a payment method.
EventEspresso comes with Invoice, Authorize.net AIM, Bank Draft, Check, PayPal Pro, and PayPal Standard payment methods. To choose a payment method go to Dashboard and then click on Event Espresso > Settings > Payment Methods.
Activate the payment method you want to use, and then provide the details required to use that payment method.
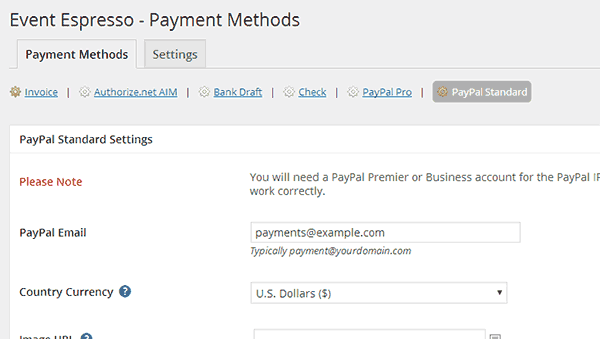
Once you have configured a payment method, the next step is to create your event in the EventEspresso.
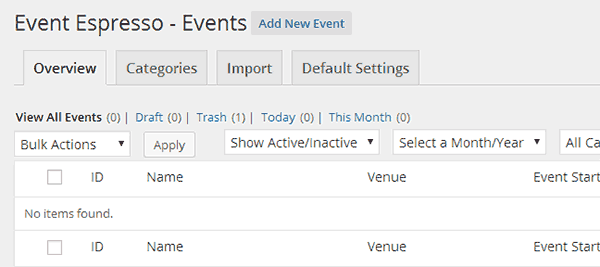
Go to the Dashboard and then click on EventEspresso > Events. Click on the Add New Event button to create your event.
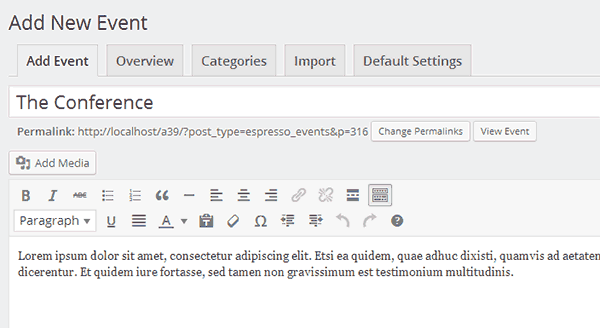
Provide your event title, and add the description. Make sure that the event title and description and similar to your event details in Fudge.
After that scroll down to Event Tickets & Datetime section. There you need to select your event date and time and then enter ticket information. You can create different types of tickets here by clicking on create ticket button.
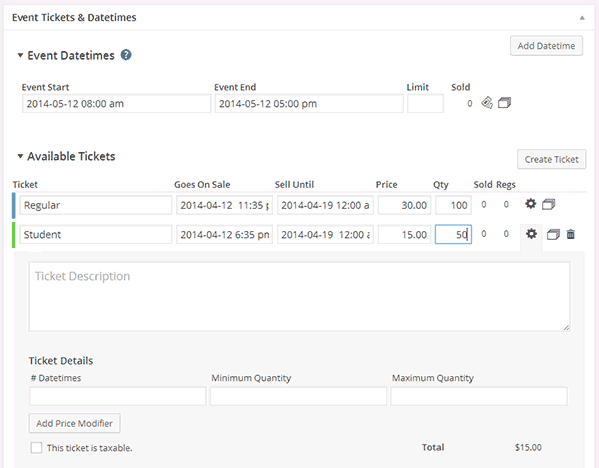
Once you are satisfied with the event, you can hit the publish button to make it live. EventEspresso will publish your event. On the Event page you will now see shortcode button below the Event Title.
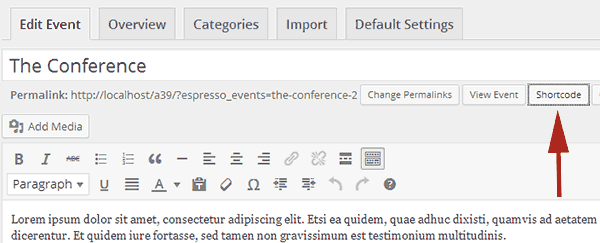 Click on the shortcode button, this will bring up a popup containing a shortcode. This shortcode will look something like this:
 [ESPRESSO_TICKET_SELECTOR event_id='316'] . Copy this shortcode, as you will need it in the next step. To display the ticket registration on the homepage, Go to Dashboard > Appearance > Widgets, and drag and drop Fudge Registration widget to your Homepage. Paste the shortcode you copied earlier in the Main Text field and then paste it in the Registration Embed Code field as well. Don’t forget to click on the save button. 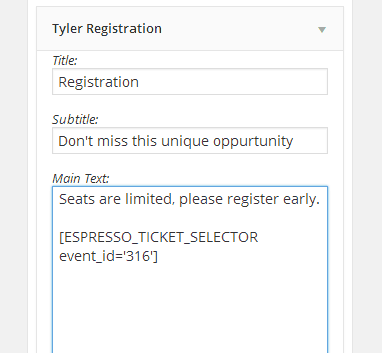 Back To Top
11.4 Woocommerce
This tutorial is to set up Woocommerce with Fudge. Woocommerce is a powerful plugin to turn your site into an ecommerce platform.
While Woocommerce is not a platform to sell event tickets, we have tweaked it to make it’s product selector a ticket selector.
Bear in mind that if you use Woocommerce as your ticketing option in one of our themes, you won’t get specific event functionality. ‘Products’ will become ‘Tickets’ and everything will be geared towards selling tickets, not products. The add to basket functionality will be dedicated only to selling tickets and selling other products than tickets may be compromised.
Once you set up Woocommerce, you can go ahead and create your ‘Products’. These will be effectively your tickets.
Our ticket selector can sell:
– External Products
– Grouped Products
– Discounted Products
– Variable Products
– Virtual and Downloadable Products
Please refer to Woocommerce documentation to learn more about products.
Once you’ve created your products you will need to place your ticket selector in the Registration Widget.
Navigate to Appearance-> Widgets -> Fudge Registration
Now add the shortcode
[products skus=""]
to the area Registration Embed Code
Once you save, you should be able to see the ticket selector live on your page.
Note: External Products or Grouped products will display a ‘Read More’ Link
9.5 – Tickera
10. Best Practices and Tips
– We suggest to follow our directions and use the sections as instructed. Using the sections in different ways may result in compromising the layout. We won’t be able to help in that case.
– Install as few Plugins as possible. Fudge is a very flexible theme that should fulfil all your needs. We custom developed all the different functions.
There are no plugins requirements. The performance of your theme is strictly linked to installing as few plugins as possible and to respecting the section purposes.
We remind you we do not offer support or fixes when external plugins are installed. If you install them you do at your own risk.
– Do backup “ always. Before making any changes do run a backup. We have a long history of customers losing their work because they did not back up.
11. Language Integration
Here is a tutorial on how to change the language of your WordPress site.
If you want to edit the language files we provided, we suggest to use a free software called Poedit. Here is a comprehensive tutorial on how to do it.
The language files are located in /lang “ You will need to save the files here once edited.


